Small Full Bathroom Remodel Step by Step (What Worked, Mistakes, Results)
This post contains affiliate links. If you buy through them, I may earn a small commission — at no extra cost to you. I only recommend products I’d genuinely specify as an architect.
1. What is this new bathroom blogpost about?
A small full bathroom remodel done by us, DIY! In this article, I am going to tell the complete process from demolition to grouting. You can see how we have built hidden layers, like water pipes and electricity, waterproofing, how we have done the tiling and why is the grout blue.
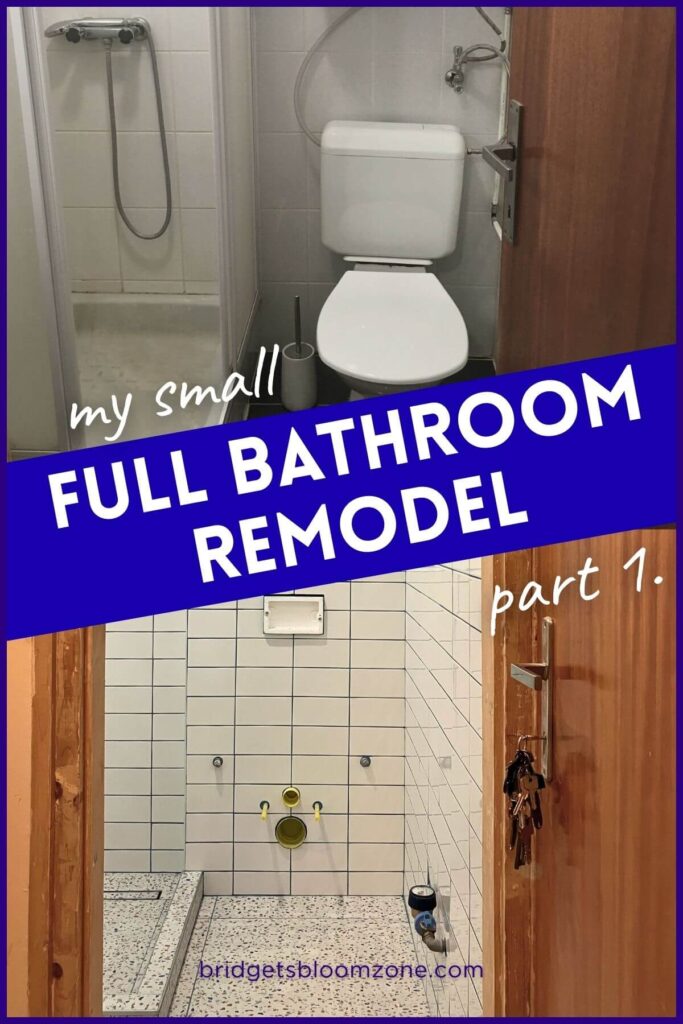
In this renovation diary, I’m documenting the entire process of a small full bathroom remodel — from demolition to grouting — all done by us, DIY, with an architect’s eye and a very real budget.
I’ll show you what actually happens during a small bathroom remodel with shower only, what worked, what didn’t, and how to plan, calculate, and control quality even if you’re not a professional.
Lets see the reasons of our small full bathroom renovation
It is a 30 year old building, the bathroom is the same age. On the bedroom-side wall, especially around the shower, there were clear signs of long-term water damage.
Something was leaking — possibly the shower tray, possibly the faucet, possibly the old steel pipes hidden in the walls.
We could have investigated – but it really wouldn’tt matter that much. Once you see moisture marks like that, you already know the answer: it needs a proper renovation.
So we made the only reasonable decision: full replacement, everything, until bare bricks.
Yes, it meant higher costs.
Yes, it meant a longer timeline.
And yes, it was unavoidable if we wanted a safe, durable small full bathroom remodel that wouldn’t quietly rot behind beautiful tiles.
In this article, I’m documenting:
- what actually happens during a small full bathroom remodel
- the real sequence from demolition to cleaning after grouting
- what worked well
- what I would absolutely do differently next time
- what materials we have used, and how much time it took.
If you also want to see, what else is happening in sour small studio apartment renovation, take a look at the first article of the series: My Studio Apartment Renovation – Architect’s Diary of a Home Makeover.
2. Planning Before Demolition — Layout, Decisions, and Limits
Every small full bathroom remodel starts long before the first tile comes off the wall. Ideally, plans are finished before demolition begins — even if those plans are simple.
This bathroom had clear limitations:
- very limited size
- existing waste water pipe routes that couldn’t all be moved freely
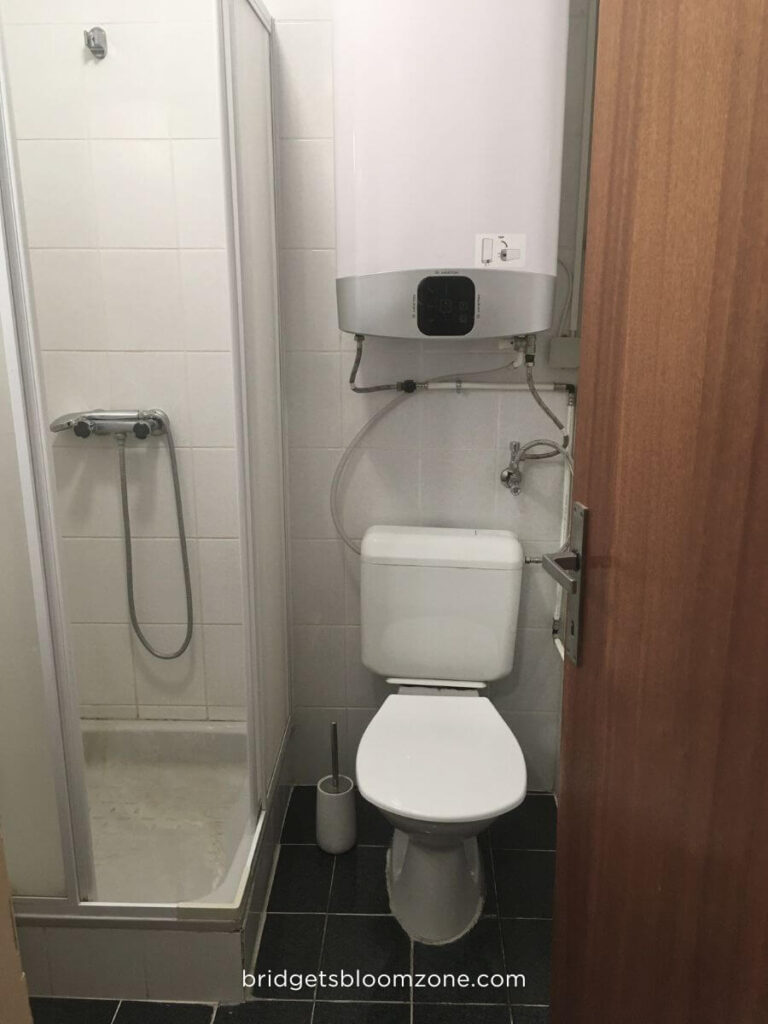
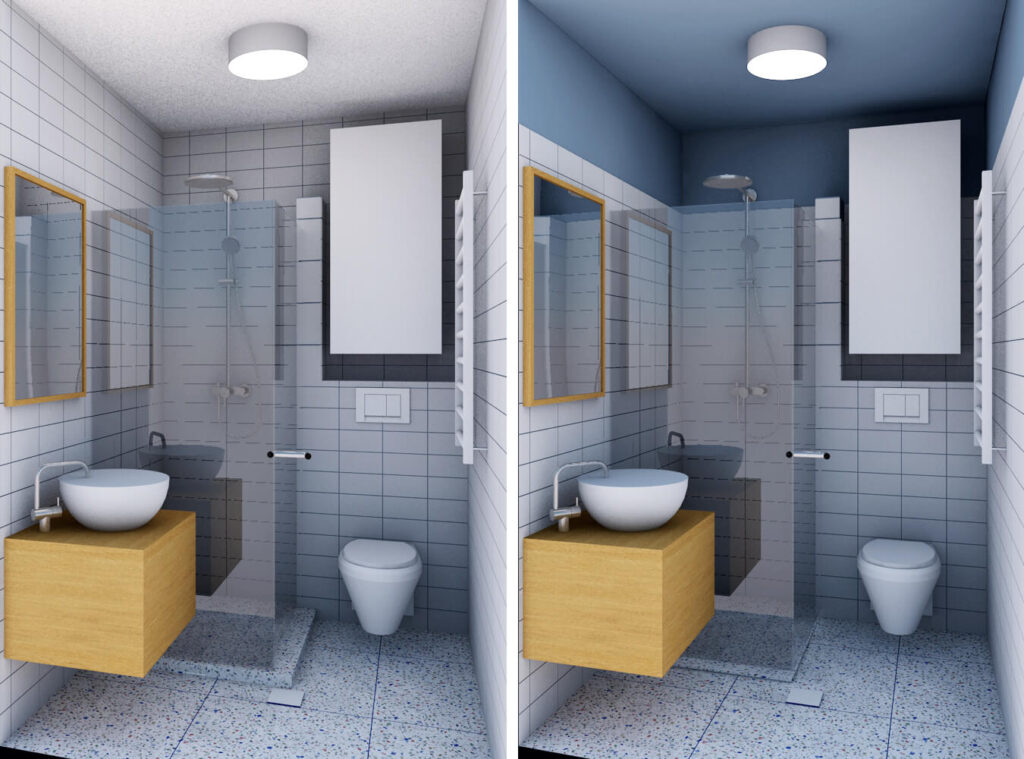
The Final Layout for our Small Full Bathroom Remodel (with Shower Only):
- we kept the original layout, because of the waste water pipes.
- a shower-only solution (no bathtub)
- a wall-hung toilet
- a wall-hung sink
- hidden and minimal storage
- wall-hung water heater
- white subway tile bathroom walls paired with a terrazzo bathroom floor
- painted ceiling
Final version is on the right side: blue ceiling, white subway tile walls and terrazzo floor.
This combination works well in a small full bathroom remodel: light walls visually expand the space, while terrazzo grounds everything. Paired with a colored ceiling gives a little fun.
My Biggest Lesson in Planning Phase:
I made some plans for the bathroom, but I stopped after we had decided about the layout and the materials. Huge mistake!
After this, I should have made the proper plans for the entire renovation, but I was lazy to do that, and so before each step there was a rush. For a bathroom remodel like this deep, you will need proper plans.
The lack of proper plans caused a big financial problem in our small full bathroom remodel – after the tiling was done on a big area, we had to demolish our freshly made tiles. Why? Read the first part here…
Pay Attention to This in Planning Phase
- exact dimensions (not “approximately”)
- installation requirements of WC frames, drains, faucets, shower systems
- minimum wall depths and fixing points
Materials We Used – Planning Phase
- Measuring tools, taking dimensions from everything
- Paper, pen or a computer with the floor plan
- My free template for renovation budget planning, where you can start collecting your chosen finishes, vanities with all information.
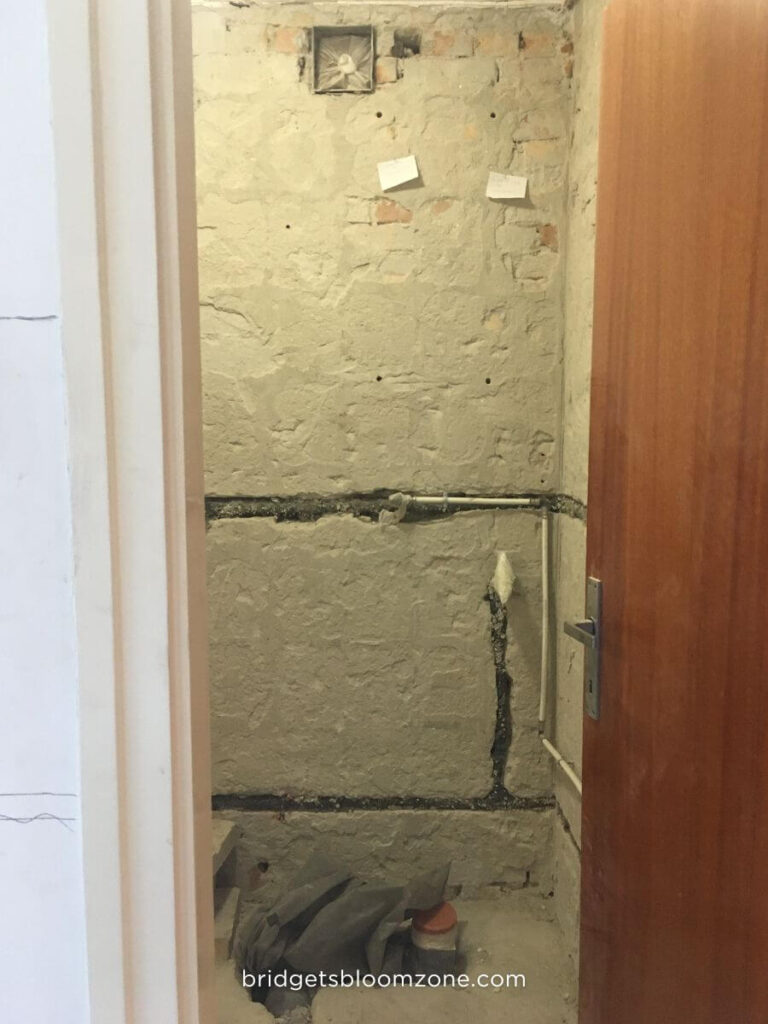
3. Demolition — Removing What No Longer Needed
Demolition is the first truly honest phase of a full bathroom remodel.
This is where assumptions fall apart and the real condition of the space finally reveals itself.
In our case, demolition confirmed what the moisture marks had already suggested: this bathroom could not be “refreshed.” It had to be rebuilt.
What we removed
- the entire floor finish
- wall tiles on all sides
- all selected wall sections to expose:
– water supply pipes
– wastewater pipes - electricity cables
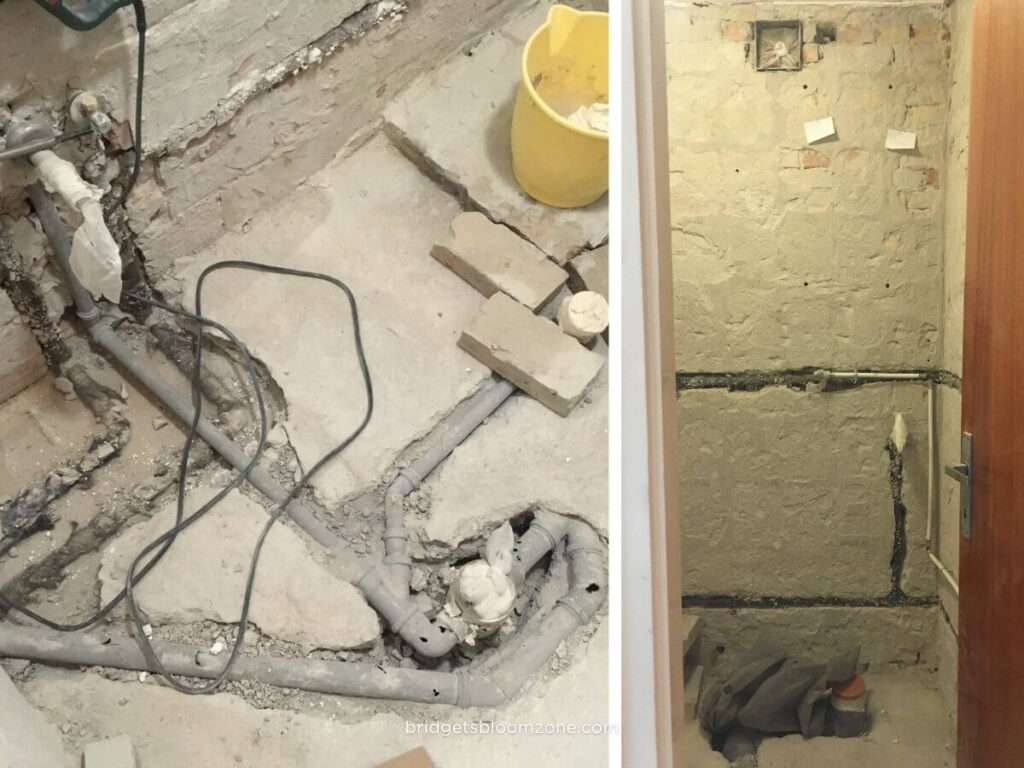
Because there were clear signs of long-term water damage, we didn’t patch or isolate problems. We replaced the full system.
Once walls are open, partial solutions make little sense — especially in a small full bathroom remodel, where failures affect the whole apartment quickly.
We also demolished additional areas where new pipe routes were needed for the updated small bathroom layout with shower only. If something is moving, its path must be opened now — not “figured out later.”
Why full demolition was necessary
- moisture damage was already visible on the wall structure
- old iron pipes had reached the end of their lifespan
- new fixtures required different pipe positions
- patching would have hidden risk behind new finishes
Once the walls were open, there was no question: replacing everything was not overkill. It was the only responsible option.
Pay Attention to This in Demolition
- structural elements that must stay
- hidden moisture damage spreading beyond visible stains
- dust, noise, and waste logistics (especially in apartment buildings)
Materials We Used in Demolition
- protective gear (mask, gloves, eye protection)
- heavy-duty bags or containers for rubble
- basic demolition tools
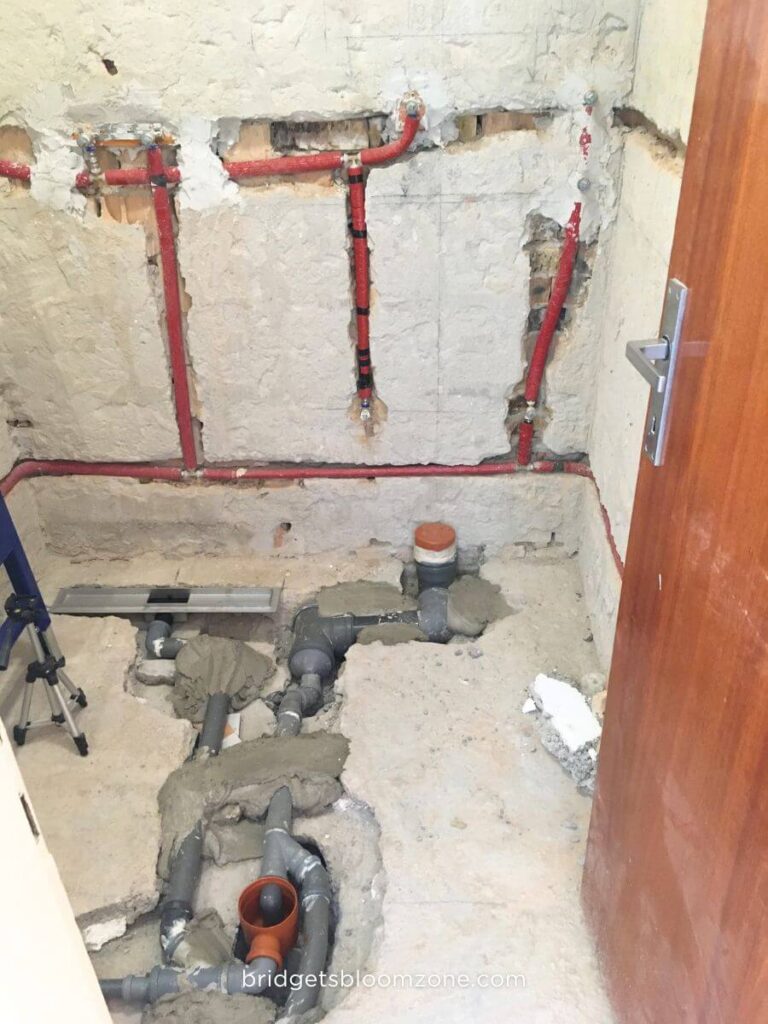
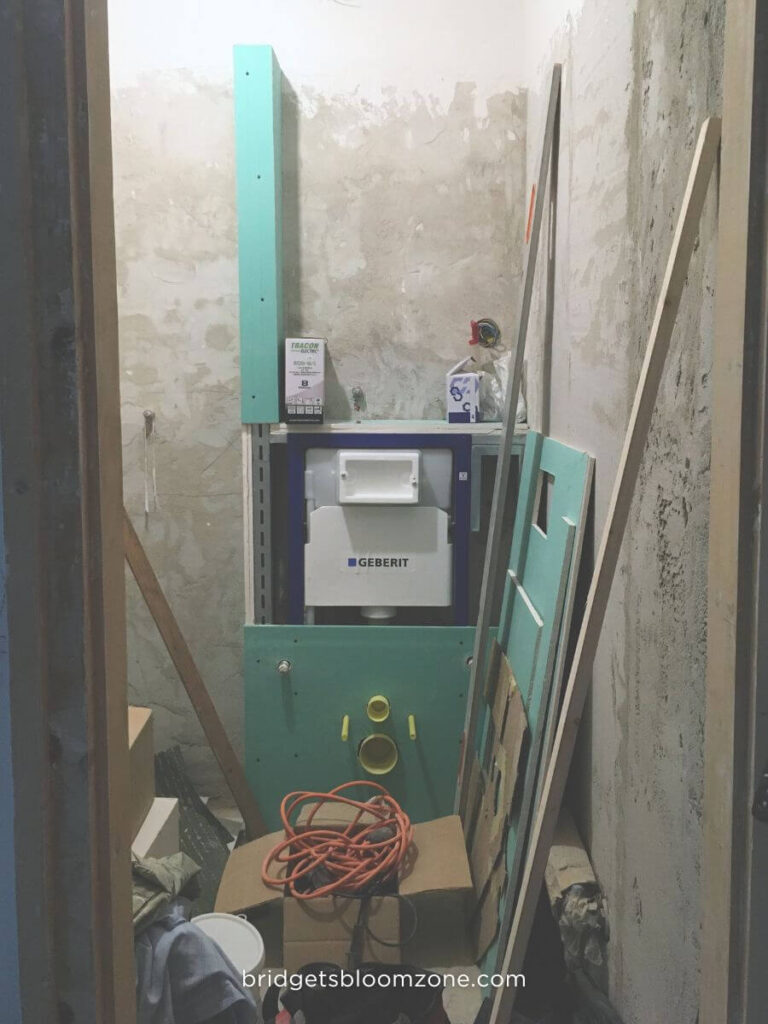
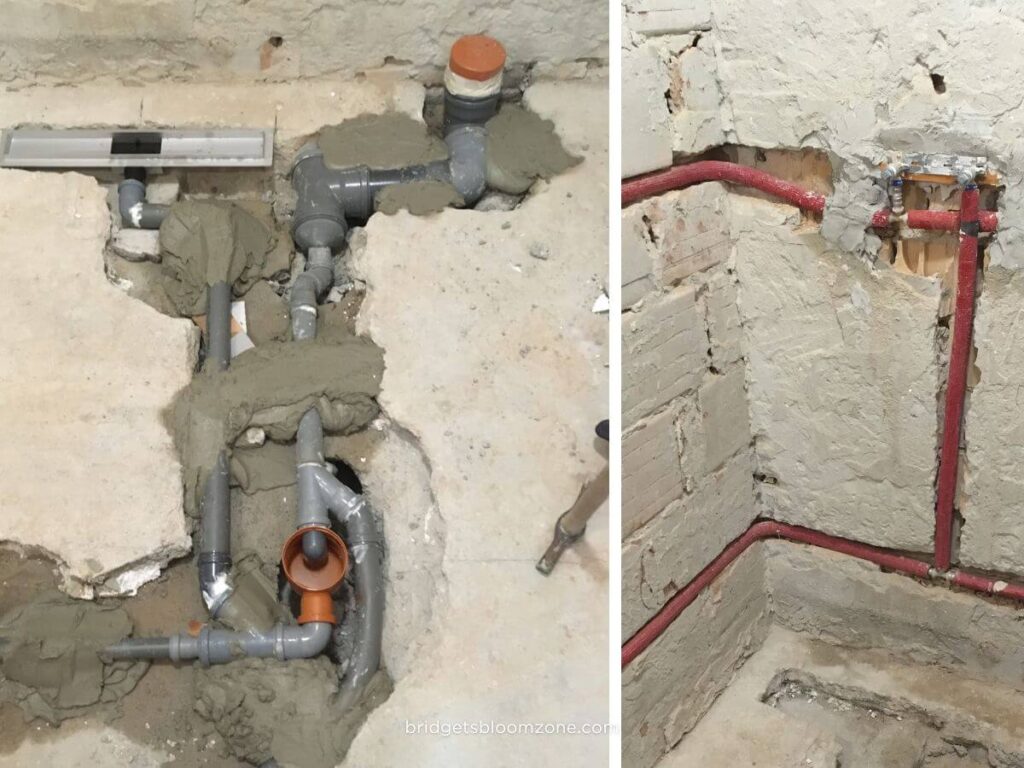
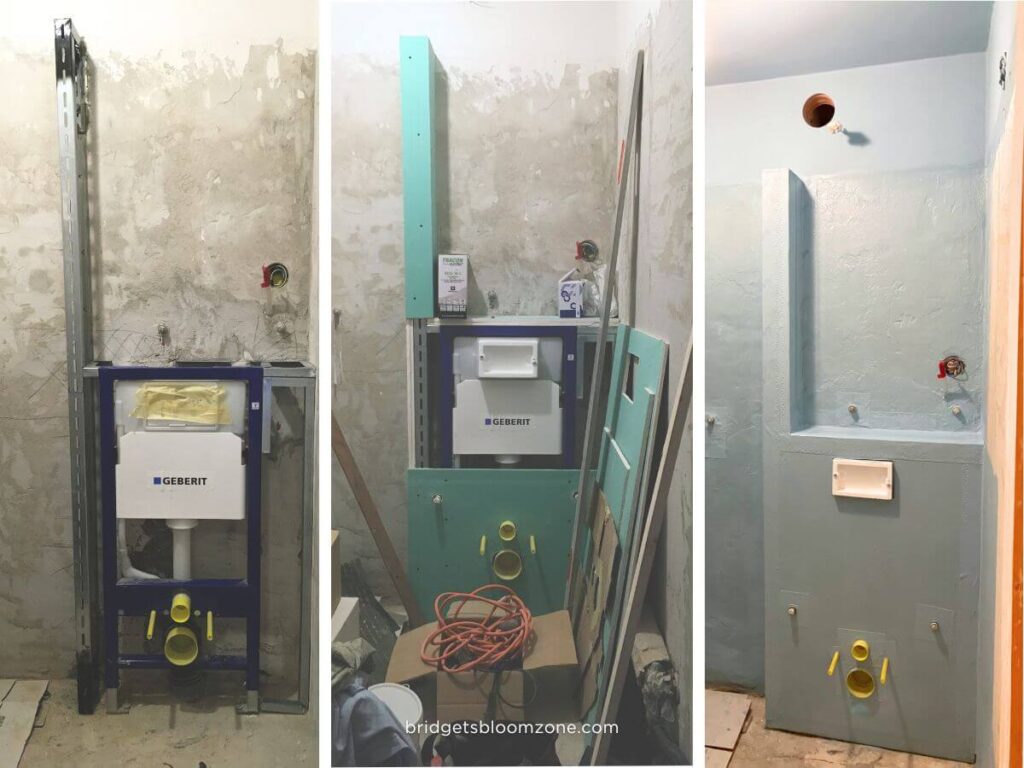
4. Water Supply & Wastewater Pipes — The Most Critical Layer
If you only understand one thing from this small full bathroom remodel, let it be this: plumbing is the foundation of everything.
We rebuilt the full water supply and wastewater system together with my father (this was one of his professions). I’ll admit: I was slightly nervous about working together on something this precise.
Plumbing requires order, specific tools, and some problem solving. Fortunately, we worked surprisingly well as a team.
And in a small full bathroom remodel, precision is even more critical — because everything is compact, and every centimeter counts. The pipes have to be built for the future products (taps, shower walls…).
What happens in this phase
This is when all hidden systems are installed:
- new water supply pipes
- new wastewater pipes
- correct slope creation for drainage
- floor drain
- shower channel (for the built-in shower)
- wall outlets for:
- shower mixer
- vanity faucet
- toilet supply
- future bidet function
- water heater tank on the wall
Everything that needs water must be decided before this step is finished.
Why this phase must be perfect
- Wastewater pipes require exact slopes.
- Outlet heights must match final tile thickness.
- Fixtures have fixed installation dimensions.
- Corrections later mean breaking finished surfaces.
This is not the decorative part of a small bathroom remodel with shower only — but it is the most important one.
Pay Attention to in Plumbing
- Correct wastewater slopes (too little = clogging, too much = noise).
1% is a good number, but this phase is made by professionals. - Precise outlet heights and distances.
- Wall depth for concealed systems.
- Final fixture dimensions (always check manufacturer drawings).
How to Control Quality? Plumbing & Waste Water Pipes
- Mmeasure, measure, measure.
- Compare with installation manuals.
- Pressure-test the system before closing walls.
Mistakes to Avoid – Plumbing & Waste Water Pipes
- Trusting memory instead of documentation.
- Trusting your workers without controlling their work results.
- Mistakes around the wall hung toilet — my big lesson in planning errors came to life… I could fill up an entire blogpost about what to pay attention to. I think I’ll do it soon!
- In a small full bathroom remodel, 1–2 cm error can affect the entire layout.
Materials We Used – Plumbing & Waste Water Pipes
- water pipes: basic five-layer composite pipes with matching fittings and connection outlets
- wastewater pipes: basic PVC pipes
- shower channel: tileable aluminum linear drain or concealed tile-in shower drain
- floor drain: tileable point floor drain
Budget – Plumbing & Waste Water Pipes
This phase was quite cheap compared to anything else. As labor work was “free”, these pipes are not too expensive.
It depends on the complexity of the water and waste water routes, and the size of the bathroom – ours was around $150 or 150€.
5. Electrical Preparation — Everything Hidden in the Walls
Electrical work happens still invisibly, and very early in a small full bathroom remodel.
Just like plumbing, it disappears under plaster and tile — which means at this moment when you already have to know everything, where and what electrical equipment you want tuse.
Because we already had a finalized lighting and switch plan, this phase was straightforward. In a very small bathroom design, lighting placement changes everything: where shadows fall, how wide the space feels, how functional the mirror area becomes.
What happens in this phase
This is when we (and our professionals) installed:
- black protective conduits inside the walls and electric cables
(these carry the electrical wires later) - lighting points in the ceiling and walls
- wall outlets and switches
- connection for ventilation, with electric cable
All cable routes were carved into the walls according to the plan. Since everything will be hidden under plaster and tile, there is no second chance without demolition.
And in a small bathroom remodel with shower only, space is limited — every outlet must justify its existence. In addition, the placement of electrical outlets and switches must comply with the required safety distances from water supply outlets.
Why timing matters
Electrical preparation must follow:
- finalized lighting layout
- mirror position
- vanity width
- switch logic
- ventilation requirements
If you change your vanity later, your lighting may no longer align.
If you forget a socket, you’ll be opening tiles again.
Pay Attention to — Electricity
- bathroom safety zones (water + electricity = strict rules)
- mirror lighting height and/or symmetry
- ventilation wiring
- future appliances (heated mirror? bidet seat? extra lighting?)
Mistakes to Avoid – Electricity
- Adding outlets later.
- Carving new electric routes, placing black protective conduits WITHOUT cables… (Whoever has to handle it later will have a tough job.)
- In a small full bathroom remodel, that almost always means cutting into finished walls.
Materials We Used — Electricity
Switches & sockets: Schneider electric products will be the visible outlets.
Ventilation unit: one with dual-mode, automatic and switch-controlled
Hidden electric stuff: protective conduits, electrical wires, electrical junction boxes and outlet boxes. I have now idea about the brand, black protective conduits, yellow and black boxes! There is a difference in shape, which belongs to each wall type.
Once electrical and plumbing are both in place, the space looks chaotic — pipes, cables, open walls everywhere.
But this is actually a turning point in a small full bathroom remodel: the invisible systems are complete.
From here, we start building the surfaces again!
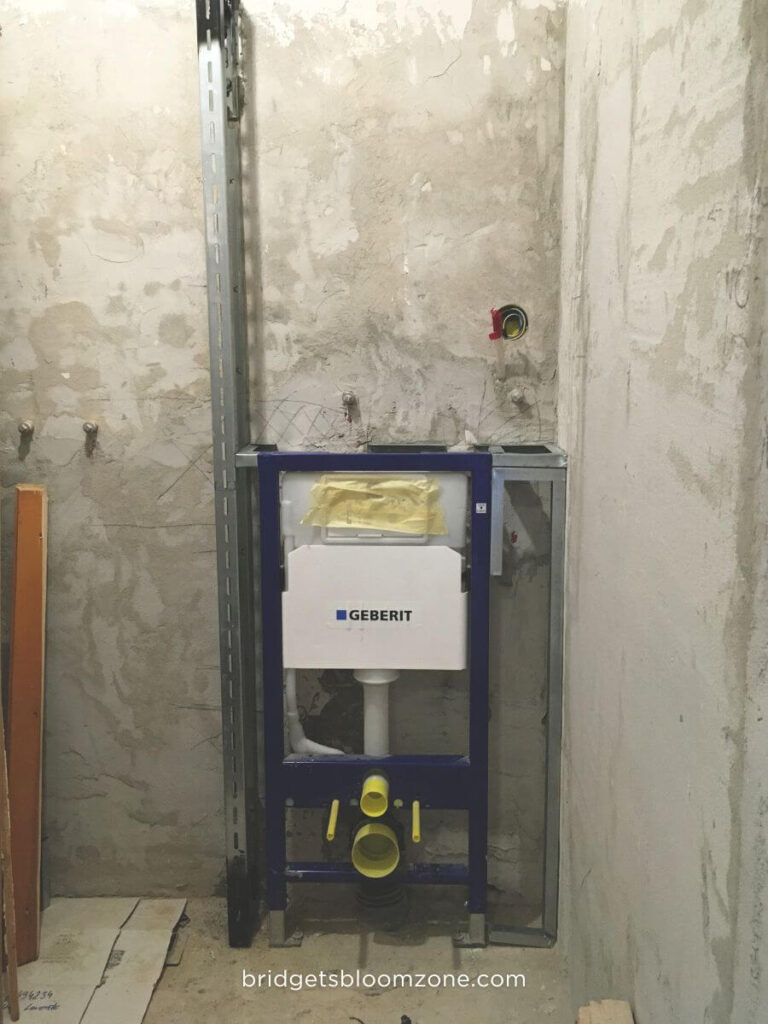
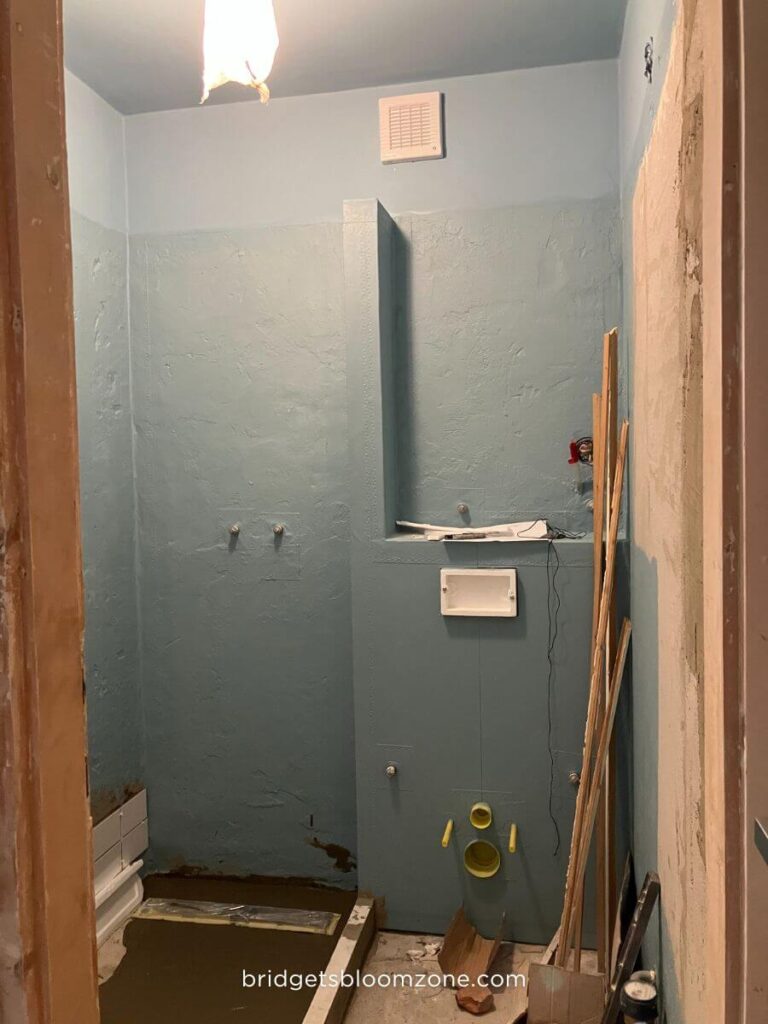
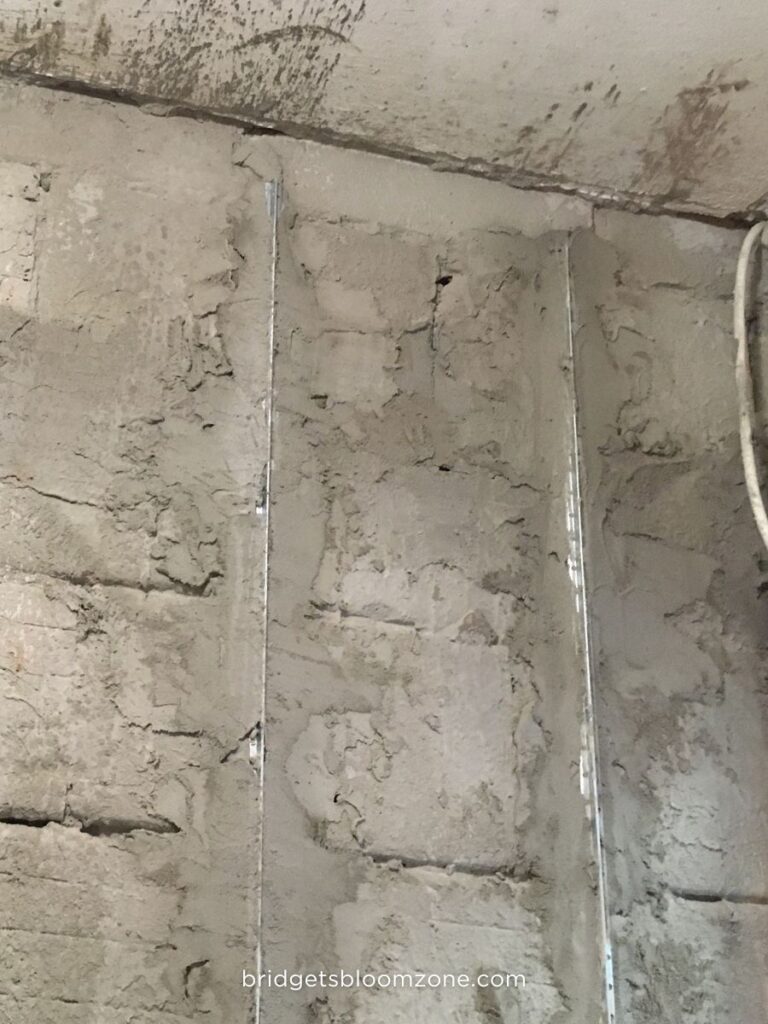
6. Wall Repairs & Plastering — Creating a Perfect Base
Good tiling is almost impossible on bad walls. Period.
After plumbing and electrical work, the walls and floor looked like a battlefield.
This is when we repaired and replastered all surfaces, rebuilding the wall and floor planes from scratch. In a small full bathroom remodel, it should be a precise work.
And if you’re planning a white subway tile bathroom or a clean subway tile bathroom wall, be warned: white shiny tiles are brutally honest. They highlight every curve, every tilt, every uneven line.
The straighter the walls, the easier — and more precise — the tiling phase will be.
What happens in this phase
- repairing damaged plaster areas
- closing wall chases
- rebuilding clean, straight wall planes
- smoothing surfaces for tiling
- building new wall sections, if needed (for us: drywall box for the wall-hung toilet)
- also installing structure and support for wall-hung elements: tolilet tank, etc.
This step defines how refined your final result will feel.
Pay Attention to — Walls
Check carefully:
– vertical alignment with a spirit level
– flatness in all directions
– sharp, clean edges in corners
Around the water connection points, it’s better for the wall surface to be slightly concave – you’ll see why later, when installing waterproofing.
Materials We Used – Walls
plaster / repair mortar: Baumit ready-mixed plaster for walls
drywall system: Knauf Moisture Resistant gypsum boards in 2 layers, steel profiles for drywalls
For the areas around electrical wiring, the same plaster is mixed with gypsum.
Once the walls are straight and smooth, the space finally feels calm again.
And that calm surface is what allows the next critical layer: preparing the floor and slopes.
7. Floor Base & Slopes — Preparing for Waterproofing
In this small full bathroom remodel, the floor base was rebuilt parallel with the wall repairs. This phase may look unremarkable, but in reality, it determines whether water behaves properly for the next 20 years.
We created the new subfloor layer and formed the correct slopes toward the drain and shower channel. In very small bathroom ideas with shower, slope precision is even more critical — there is no space for water to “accidentally” flow somewhere else.
The smoother and more accurate the base, the easier the tiling will be later.


What happens in this phase
- subfloor filling and leveling
- establishing final floor height
- creating precise slopes toward drainage
- smoothing transitions between zones
Pay Attention to — Floor Preparation
- correct drainage direction
- consistent slope percentage
- smooth, continuous transitions
- alignment with shower channel height
- Check with a level. Then check again.
Mistakes to Avoid – Floors
Thinking: tiling will “correct” the slope later. It won’t.
Although it is possible to make a slope with only tiles, so the layer of the waterproofing won’t be correct. Problems can accumulate hidden.
Materials We Used – Floor Base
- Sand was used to fill the space around the pipes on the floor, and this needs to be compacted.
- A finished concrete subfloor was poured over the pipes, aligned with the old level (Baumit also – this was available in the local shop).
- We shaped the shower slope using the same finished subfloor concrete.
Once the base is stable and slopes are correct, the bathroom is finally ready for one of the most critical protective layers: waterproofing. But here is a choice to do something else before waterproofing, which is…
8. Ceiling Painting — Timing Matters
We painted the ceiling before waterproofing and tiling.
Why? Because once tiles are installed, everything needs protection. Now, with raw surfaces, we could work freely — no masking, no stress.
The ceiling color was not accidental. As shown earlier in the visualization, we chose blue deliberately. It visually connects the bathroom to the rest of the apartment — a small surface, but a strong atmospheric decision.
Why this step now
- no need to protect finished tiles
- faster, cleaner process
- easier corrections if needed
Sometimes good renovation is simply about doing things in the right order. It is not necessary to paint now, it can be done later. We were not that
Materials We Used – Ceiling
- 2 layer of primer: Primer G by Mapei
- 2 layer of paint (color): Deluxe, custom color blend – we bought the grout, created a small sample mix, and picked the color to match it.
Since we weren’t very precise with the tiles and waterproofing (you know, we are beginners), the walls will need a fresh coat of paint once we’re done.
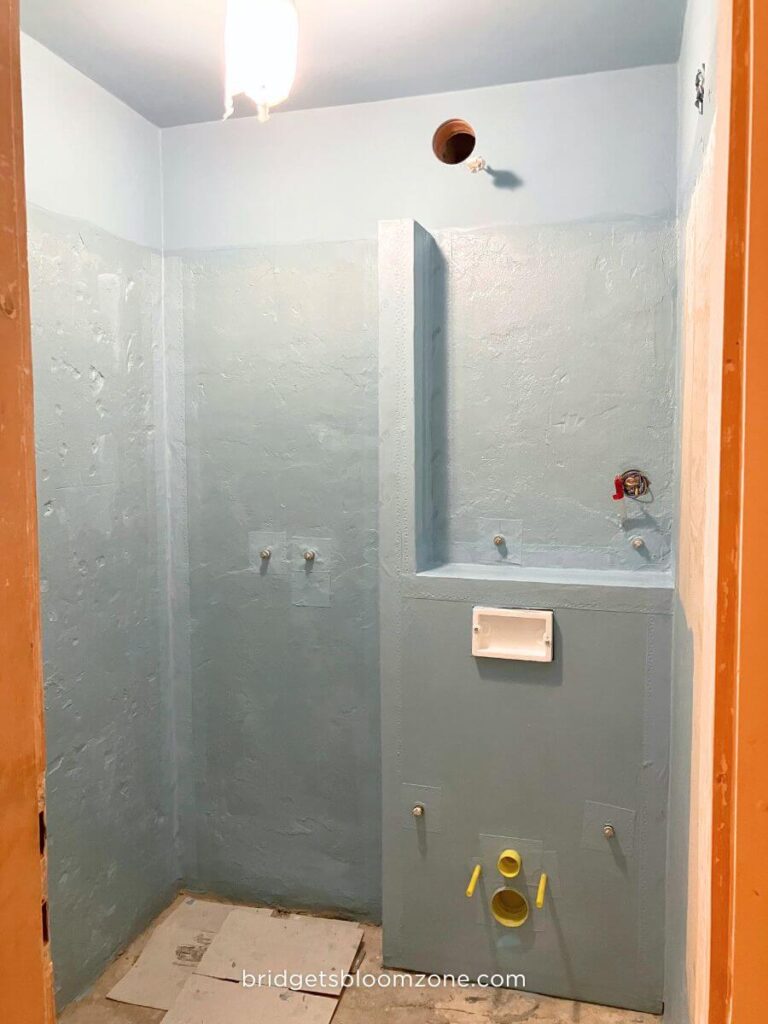
9. Waterproofing — Another Hidden Layer in a Small Full Bathroom Remodel
Once all surfaces were repaired and smooth, waterproofing could begin.
In a small full bathroom remodel, this is structural protection.
You will need something depending on your wall structure – we had brick and plaster walls and a drywall “box” behind the wall-hung toilet.
The order of waterproofing:
- We started with two layers of primer on all prepared surfaces.
- Sealing collars were installed around all water outlets.
- Reinforcement tape was applied in vertical shower corners.
- Floor–wall junctions were reinforced (but we did after tiling, it is possible to do it in this phase.
- Then the entire area received two full layers of waterproofing.
When we applied it, we noticed two things:
- The color was almost identical to our blue ceiling.
- I had bought almost double the required quantity.
Lesson learned: always double-check your calculations.
Recommended Waterproofing Heights
- Shower area: 200–220 cm
- Behind faucets: 110–120 cm
- Behind WC: up to cistern box height
- Other walls: min. 20 cm above floor level
- Entire floor area: fully waterproofed
Pay Attention to- Waterproofing
- The first step is always: use a primer!
- Reinforcement tape thickness in corners (it adds buildup)
- Keeping surfaces as flush as possible
- Continuous, unbroken layers
- Respecting manufacturer drying times
Materials We Used – Waterproofing
- Primer: Primer G by Mapei
- Reinforcement tape: Mapeband Easy by Mapei
- Sealing collars: Mapeband Easy by Mapei, we just cut pieces for the outlets.
- Waterproofing membrane: Mapeliastic Aquadefense
With waterproofing complete, the bathroom is finally protected.
And now, the visible transformation can begin: tiling.
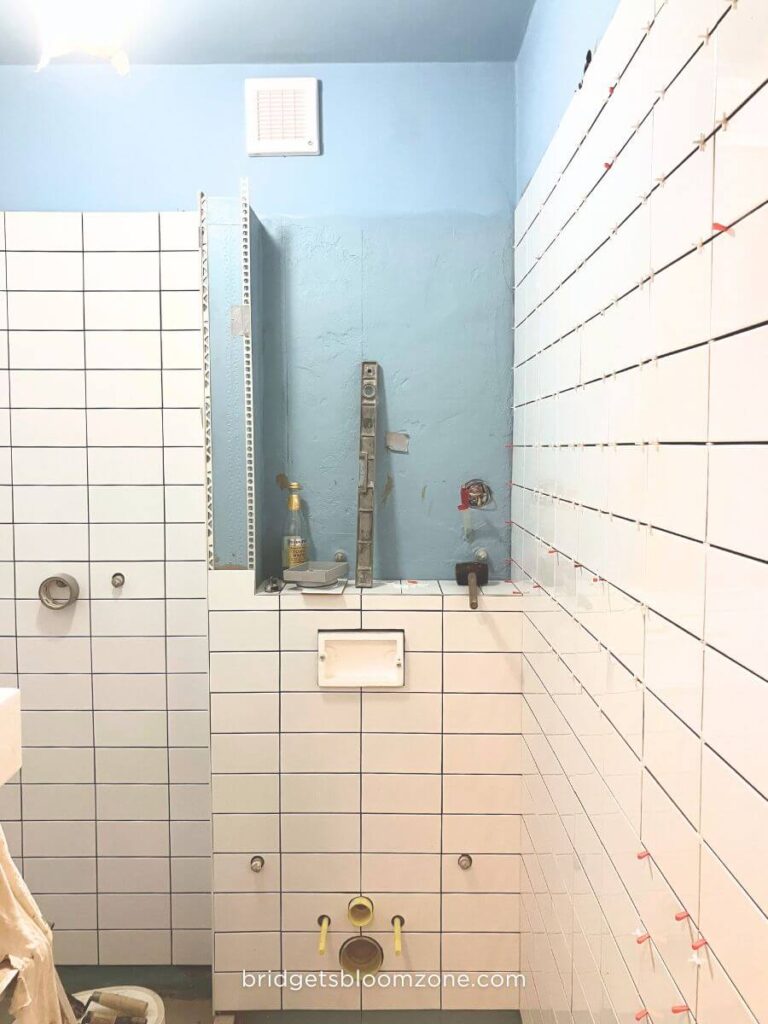
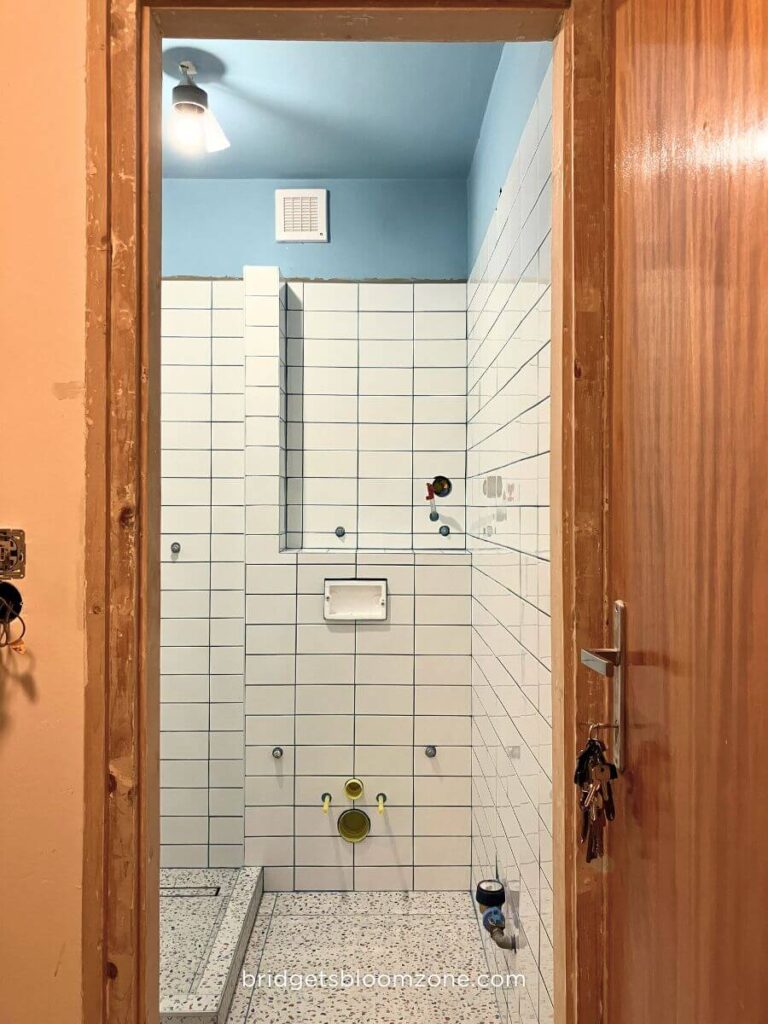
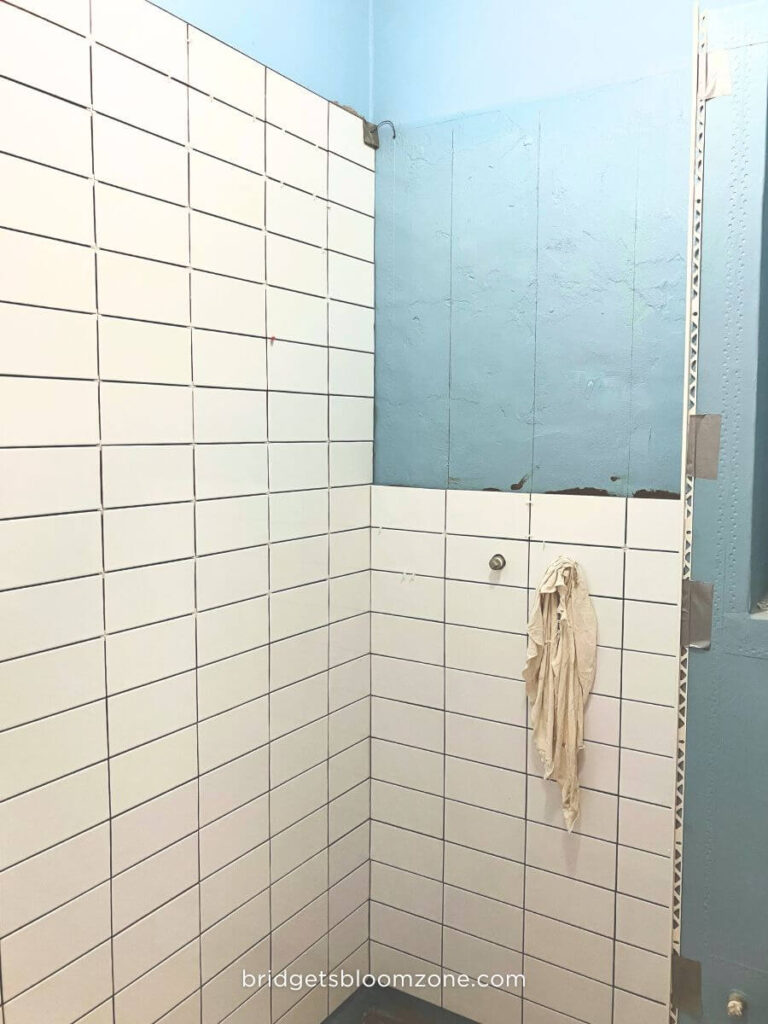
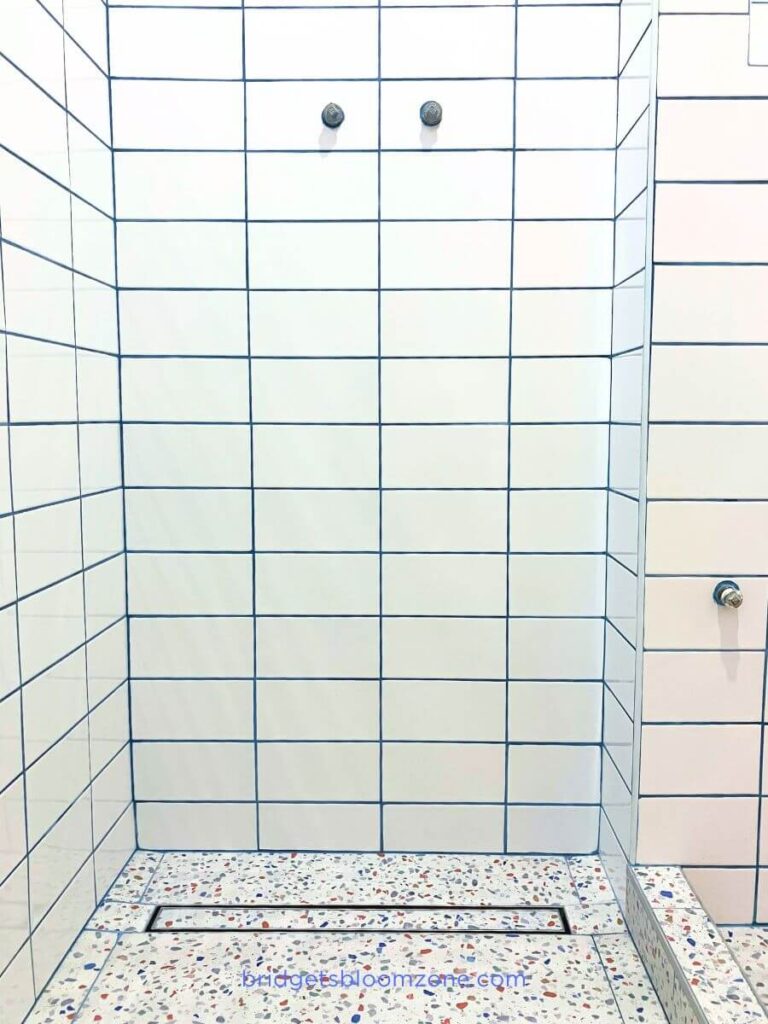
10. Wall Tiling — White Subway Tile Installation
This is where the small full bathroom remodel finally starts to look like a new bathroom.
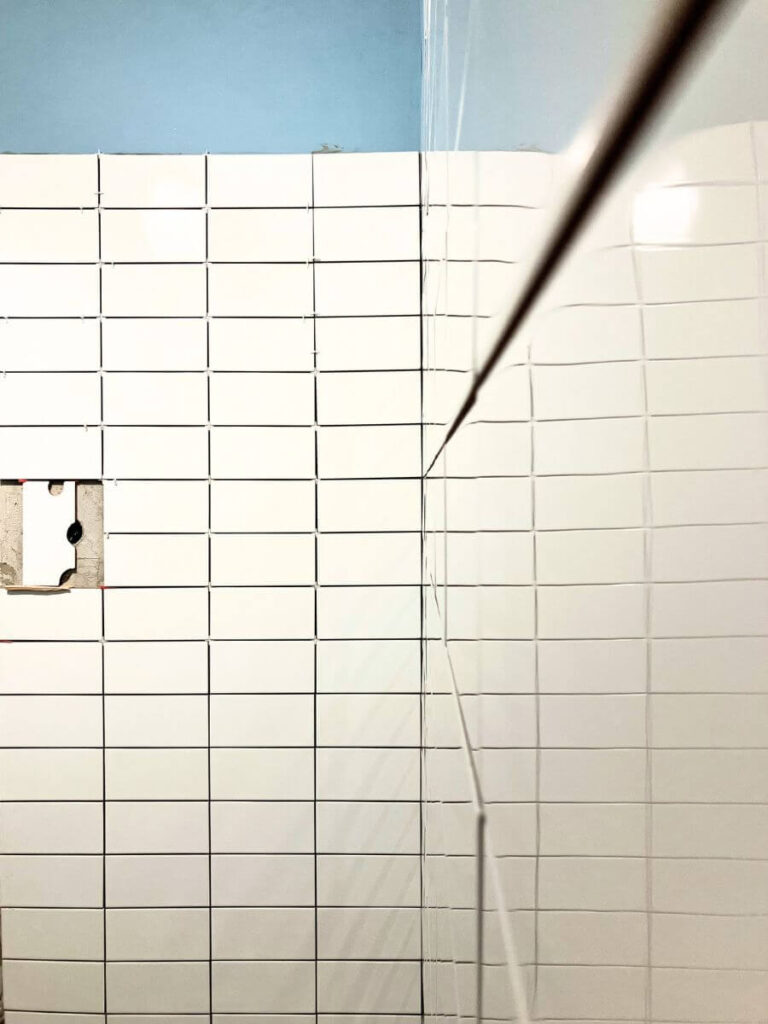
Before installing a single tile, I calculated the full layout. I tested both 2 mm and 3 mm grout lines, even laying them out on the floor to compare. The difference is minimal at first glance — but millimeters accumulate.
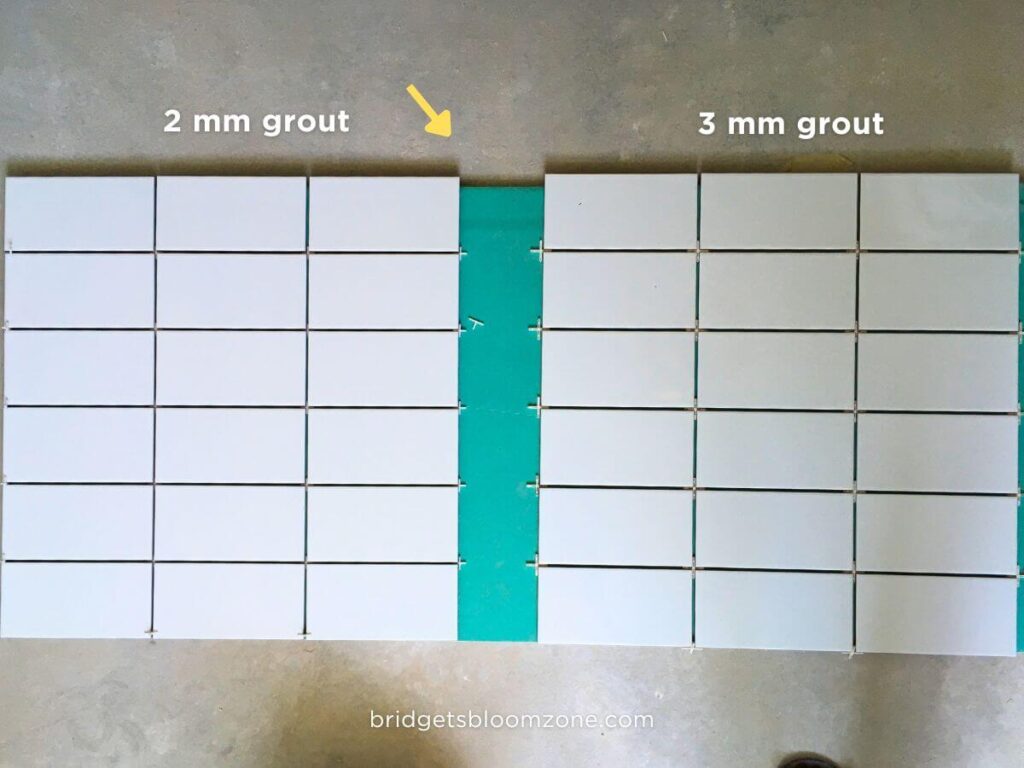
in this little sample, the difference is already visible between the two sides.
I chose 2 mm grout:
- fewer edge cuts
- cleaner transitions at corners
In a white subway tile bathroom, precision is everything. White tiles are graphic. They create rhythm. And rhythm must be controlled.
We installed the tiles together with my father, using a laser line aligned with the grout joints. With a straight base surface, progress becomes surprisingly smooth — even with smaller tiles.
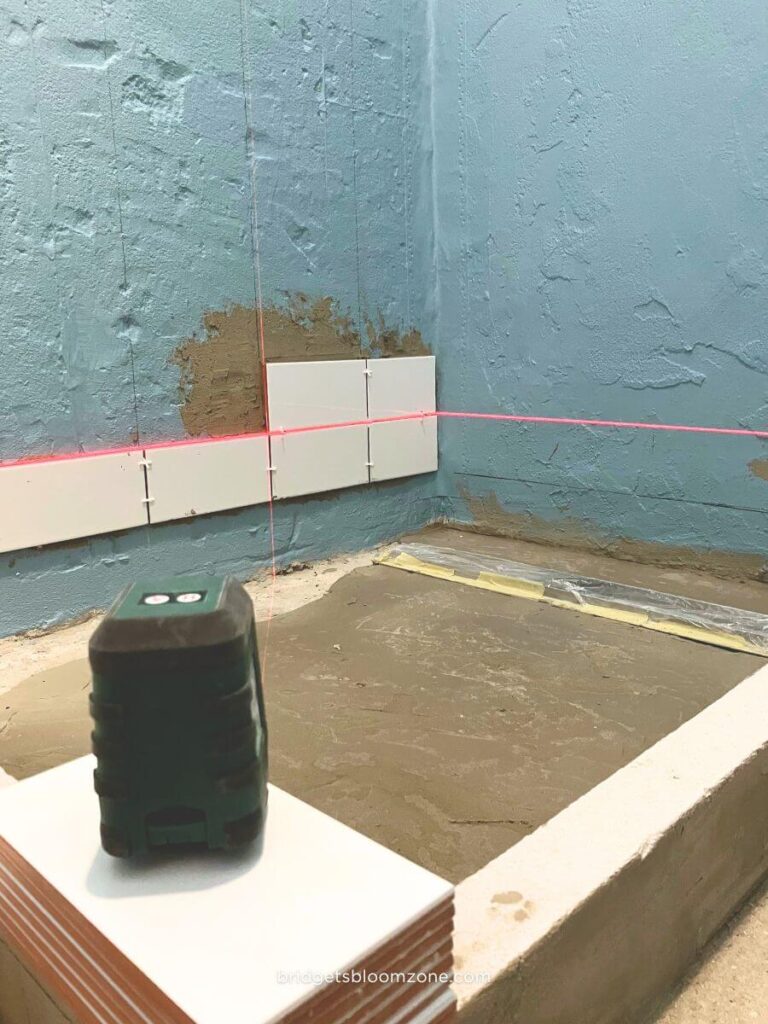
Still, every direction was constantly checked with a spirit level. Laser helps. Geometry decides.
What made this phase work
- precise layout calculation before starting
- choosing grout width intentionally
- straight, properly plastered wall base
- laser-guided installation
- continuous vertical checks
- a tile cutter – small tiles are possible to cut with a hand tool, but it needs some strength and technique.

Good preparation makes tiling feel almost effortless.
We started tiling from the “second row” from the bottom, so all rows were built on the previous row.
How to Establish Quality in Wall Tiling?
- Test grout widths physically before deciding.
- Starting from a calculated reference line.
- Keep cuts symmetrical where possible.
- Check grout lines (tile edges) with laser level or spirit levels.
Materials We Used – Wall Tiling
- Wall tiles: white subway tiles.
- Tile adhesive: Mapei Adesilex P9 -when using tile adhesive, it’s important to check what type and thickness of waterproofing is underneath, as well as the size of the tiles.
- 2 mm spacers.
- laser level, small and large spirit levels
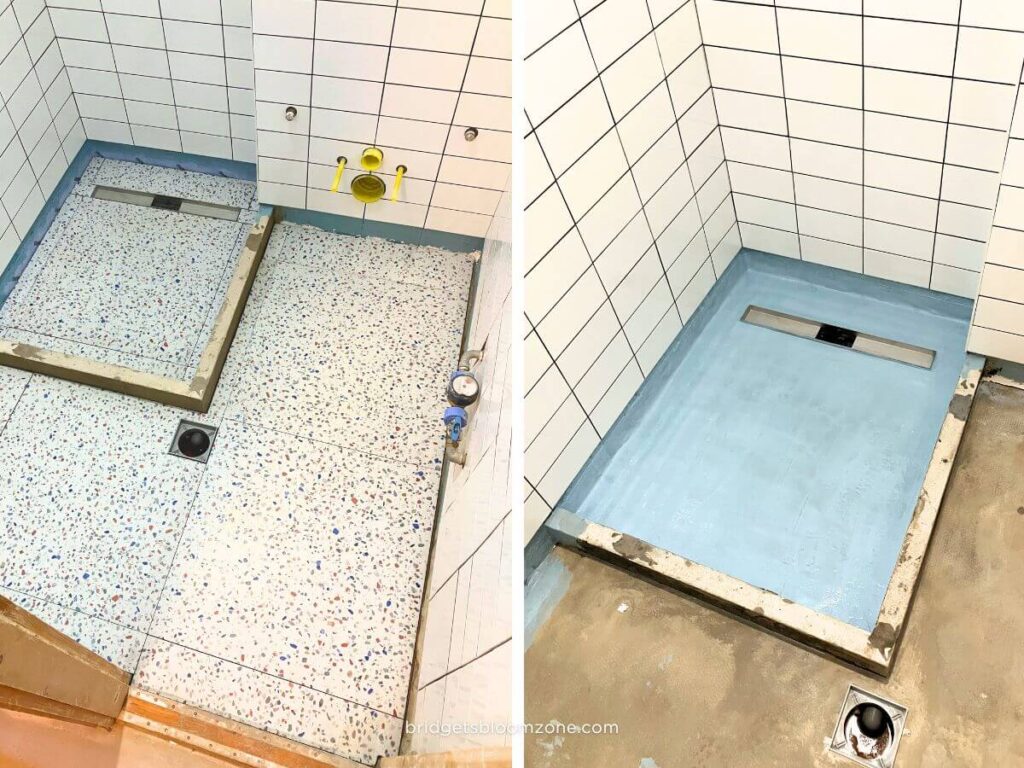
11. Floor Tiling — Terrazzo Tiles Step by Step
Once the walls were finished, the visual focus shifted downward.
The terrazzo bathroom floor was always meant to anchor the space.
Before tiling, the floor preparation followed a strict sequence:
- 2 layers of primer
- reinforcement tape along wall junctions and around drains
- 2 layers of waterproofing across the entire floor
We made waterproofing section-by section.
We began by waterproofing the shower floor. After it had fully dried, we laid the floor tiles that had been cut to size beforehand, and then applied waterproofing to the rest of the bathroom floor.
By the following day, the entire bathroom floor was tiled in just a few hours.
The timing of the floor waterproofing is a personal choice. In my opinion, it’s better to do it after the wall tiling is finished, because this way we can move around freely without worrying about damaging the waterproofing.
Smart Workflow (That Saved the Waterproofing)
Our tiles are 66×66 cm terrazzo-pattern porcelain slabs. 2 mm grout as on the walls.
Before applying adhesive, we:
- The floor tile plan was ready and printed, including all measurements.
- Cut every single tile to size.
- Dry-fitted them in place.
- Checked drain alignment.
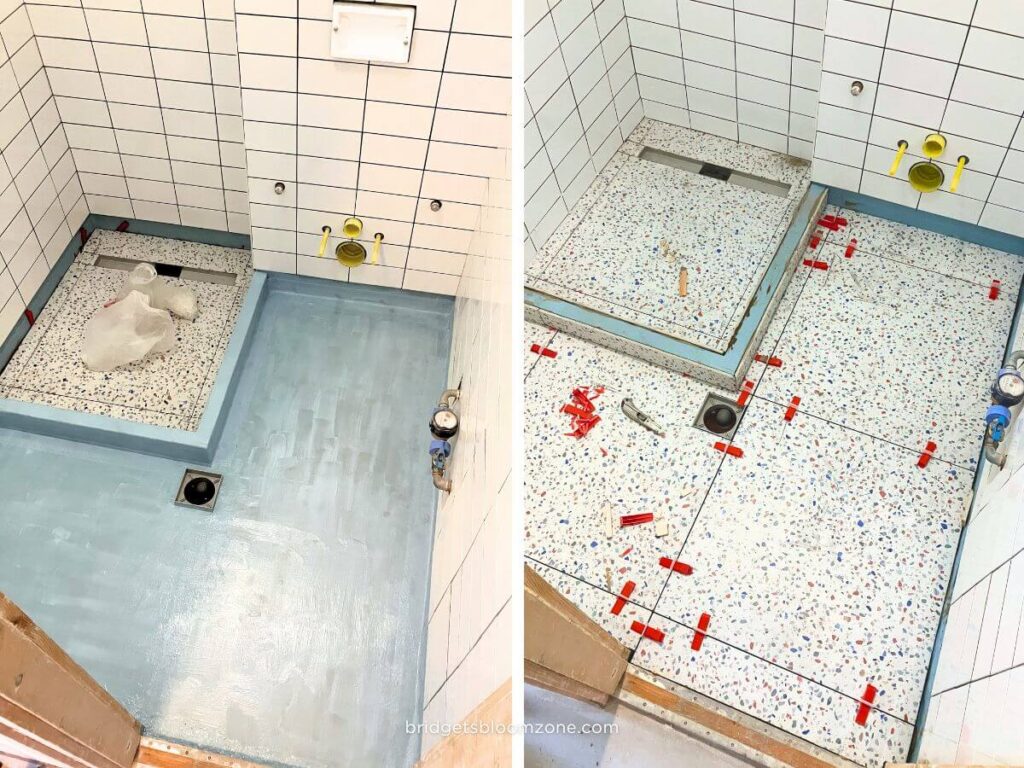
This meant that after waterproofing was complete, we only needed to apply adhesive and place the tiles. No repeated walking, no unnecessary cutting, no damage to the waterproof layer.
In a Small Full Bathroom Remodel, it was a fast. clean, controlled strategy.
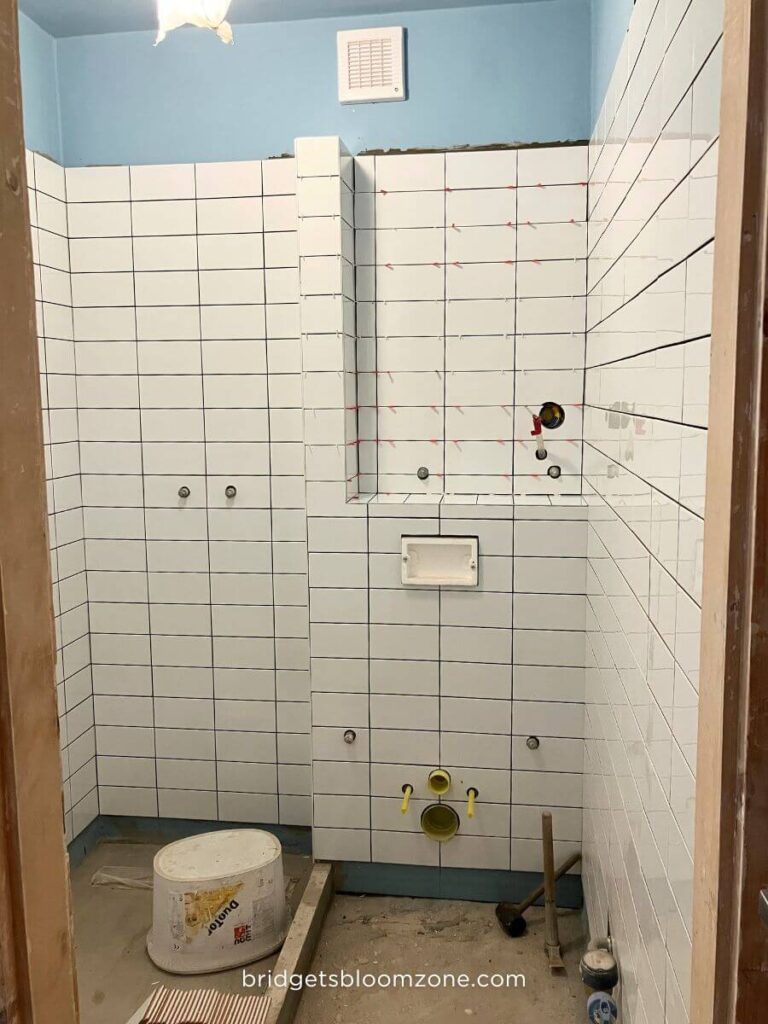
When the drying time was over, we just made the missing the lowest row of subway tile on the walls.
Pay Attention to — Floor Tiling
- perfect alignment with floor drain / shower channel
- slope consistency toward drainage
- tile orientation (pattern flow matters)
- adhesive coverage under large tiles
Materials We Used – Floor Tiling
- Primer: 2 layers of Primer G by Mapei
- Reinforcement tape: Mapeband Easy by Mapei
- Waterproofing membrane: Mapeliastic Aquadefense
- Tile adhesive: Mapei Adesilex P9 (still good for this size on floor)
- Terrazzo gres tiles (66×66 cm)
With the floortiles installed, the bathroom finally felt grounded.
Next comes one of the most satisfying moments: grouting and finishing touches.
12. Grouting — The Final Surface Layer
Once everything is installed, there’s only one technical step left: grouting.
We used Mapei grout — my personal preference. The color range is beautiful, the quality reliable, and everything is easily available. For a white subway tile bathroom, grout color defines the entire rhythm of the wall.
The mixing process is simple:
- measure water precisely
- add grout powder according to instructions
- mix to smooth consistency
- press firmly into joints
What surprised me again?
The amount required. With small subway tiles, the length of grout lines is almost shocking.
There are literally hundreds of meters of joints in a small full bathroom remodel like this. In a subway tile bathroom wall, grout is not secondary — it’s graphic structure.
We did the entire grouting ourselves. It’s repetitive, physical, and time-consuming — but also deeply satisfying.
here before the final cleaning.
One more practical tip:
Mapei has an online grout calculator, and it’s genuinely useful. You simply enter the surface area, tile dimensions, tile thickness, and grout joint width — and it calculates the required quantity quite accurately.
Here is the link to the calculator – I don’t get any commission for mentioning this; I just genuinely like the brand and appreciate tools that make planning easier.
After overbuying waterproofing earlier, I was happy to double-check the grout amount properly this time.
Pay Attention to — Grouting
- correct water ratio
- consistent filling depth
- working in manageable sections
- thorough sponge cleaning at the finish, and after drying
- after finished, go through every line to double check, everything is sealed.
- Direction of applying grout: from wall to floor!
Mistakes to Avoid – Grout
Rushing the cleaning phase. Grout haze is easier to prevent than to remove later.
Maybe clean a few times after each phase has dried – but careful, the fresh grout can be sensitive in the first hours.
Materials We Used – Grout
- Blue grout: Mapei Keracolor FF Flex, color: “167 air”
- Mixing bucket & paddle
- Rubber float
- Sponge & clean water
- Clean textiles for cleaning
After cleaning and drying, the technical work is officially complete.
What remains: silicon sealing on floor and shower edges, after everything has dried properly.
13. What Worked Well Overall in my Small Full Bathroom Remodel
Full system replacement: Replacing all pipes, drains, and electrical lines worked well, was easily done.
Calculated material backups: Extra tiles (and waterproofing) saved stress – you can read the story of our mistakes, how the first tiling was made.
Clear sequencing: Following the step-by-step plan made the renovation predictable and efficient.
Professional mindset in DIY work: Measuring, checking, and verifying every step paid off.
Collaboration: Working with my father on plumbing brought expertise while keeping it personal and flexible.
14. What I Would Do Differently Next Time
- Prepare execution drawings.
Even a small bathroom remodel benefits from a layout plan — it prevents conflicts like the WC frame vs. pipe issue we had. - Decide built-in elements early.
Storage, vanity, faucets, and bidet function should be confirmed before any work, latest before fixing waterpipes. Late decisions cost time and create extra work. - Double-check quantities before ordering.
- Daily quality checks..
If you hire professionals, it is necessary to check what they have built in a day. Inspect each phase before it’s covered — it’s the only way to avoid hidden mistakes. Also if you, yourself are doing some important step: control your own work!
Current Status & Closing Thoughts — A Small Full Bathroom Remodel as a System
Right now, our small full bathroom remodel is paused before the final step: installing sanitary fixtures. The next updates will cover:
- Fixture installation (toilet, bidet, shower, taps)
- Final styling touches
- Observations on long-term use
Takeaway: Planning, checking, and sequencing are everything. A well-thought-out process makes the difference between a bathroom that merely looks good and one that will serve you reliably for decades.
If you’re planning your own small full bathroom remodel, save this diary, revisit it, and adapt it to your space. It can be used to plan time, and control work.
And please — ask me anything! I love talking about bathroom planning, layout ideas, and tiny bathroom solutions. I promise, no question is too small when it comes to creating a functional, beautiful space.
Stay tuned: the next chapter will show the fixtures in place, final styling, and real-life lessons from renovating this tiny, transformed bathroom.
And if you’ve been through a renovation yourself — I’d genuinely love to hear what worked (or didn’t) for you.