10+ Subway Tile Patterns – Inspiration For a Small White Subway Tile Bathroom
How I Have Found The Best Subway Tile Patterns for my White Bathroom
Now that we’ve explored how grout color can transform white tile, it’s time to talk about Subway Tile Patterns — the next big decision that shapes your bathroom or kitchen’s entire look. The pattern you choose doesn’t just affect style; it changes how light, proportion, and even space are perceived — especially in a small white subway tile bathroom like mine.
If you’ve followed my studio apartment renovation journey, you already know my design mantra: funny, smart, cozy, minimal. I wanted a bathroom that felt fresh and timeless, with clean white subway tiles and a playful touch through grout color. But as soon as I started browsing tile webshops, I realized — layout matters just as much as color.
Not to mention, grout color is just one way, how you can add colors to your bathroom – read my article about colors in the bathoom for more ideas!
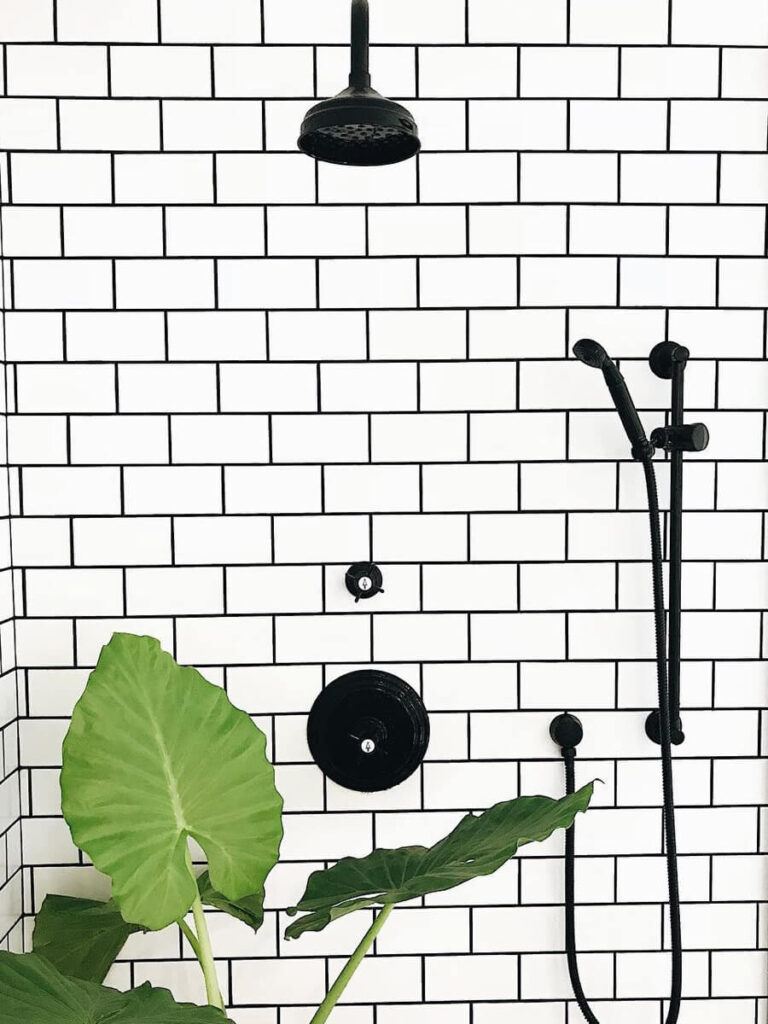
Industrial-style shower with black hardware, white subway tiles, striking dark grout, and bold greenery creating a modern, fresh look. Source: bathroom by @homeonstephens 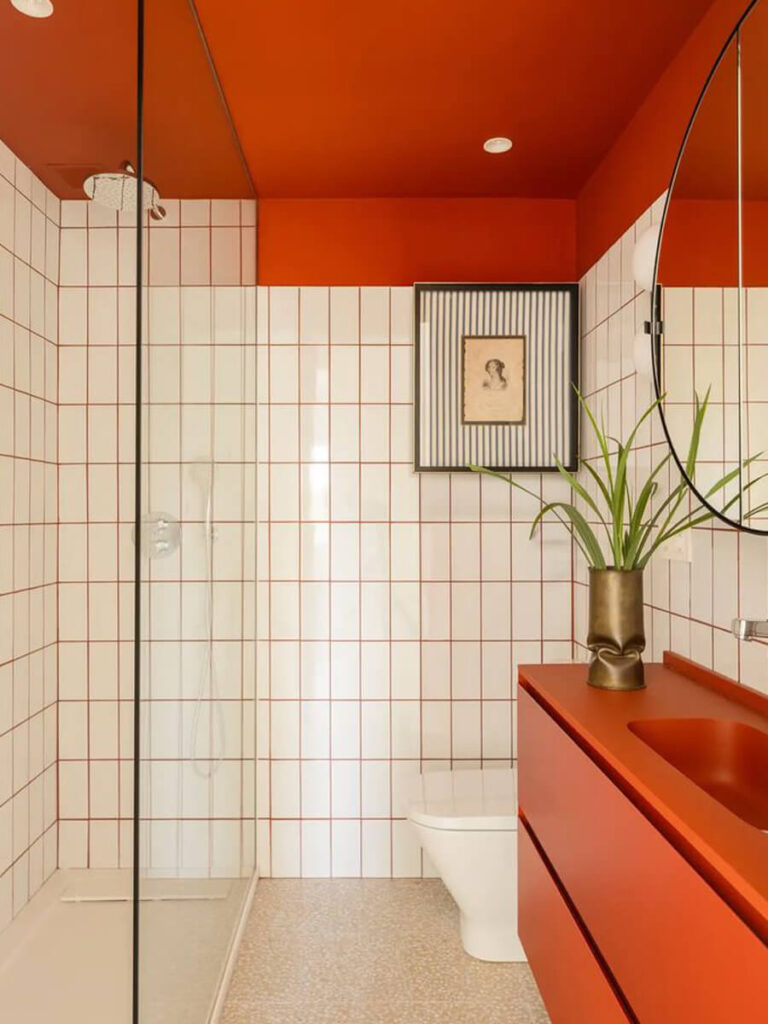
Bold bathroom: orange grout coordinates with orange ceiling and cabinet, terrazzo floor adds a modern touch. Found it here. 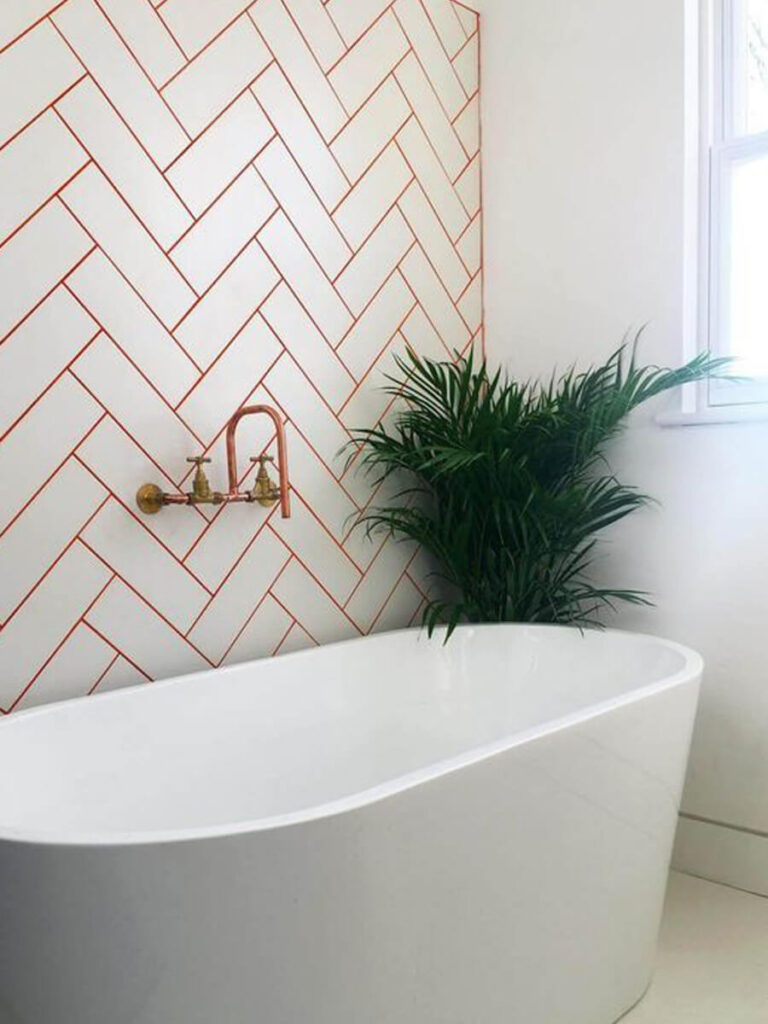
Herringbone red grout and greenery mix for a fresh and energizing bath. Source
Different subway tile layouts can make the same wall feel classic, modern, or even architectural. A simple shift or diagonal turn can stretch the space, add rhythm, or highlight a feature wall.
In my oppinion, there are 2 best ways to find out, what is the best subway tile pattern for your bathroom, kithcen, or any surface:
- Experiment with your tiles, make pattern variations on the floor.
- Look for examples on Pinterest.
I did of course both! Here is a small gallery about the patterns that I loved – and this blogpost is about the examples, that work best in small bathrooms or kitchens!

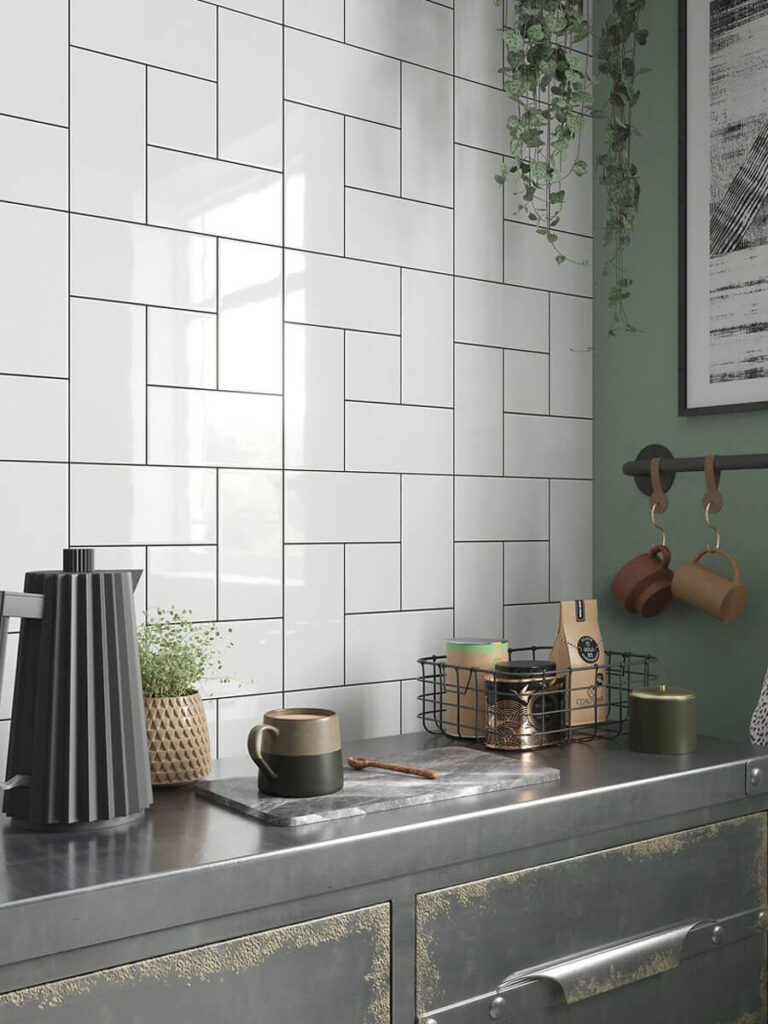
A classic subway tile pattern – horizontal grid. Examples in this blogpost! A classic subway tile pattern – vertical grid. Examples in this blogpost! A classic subway tile pattern – horizontal running bond. Examples in this blogpost! A classic subway tile pattern – vertical running bond. Examples in this blogpost! A not so classic subway tile pattern – horizontal running bond, but running vertically. Looks interesting! An other unique idea for horizontal running bond, but with vertical tiles. Definitely looks good on large surfaces! Examples in this blogpost! A simple 2×2 basket – a classic and playful subway tile pattern. Examples in this blogpost! A simple 3×2 basket – a classic and playful subway tile pattern. Examples in this blogpost! An experimental pattern from me: a complex basket… – I can imagine this pattern on the floor, or larger surfaces. Horizontal and vertical columns mixed. Horizontal grid, with a vertical line inserted – great, if you love some extravagancy, but you are still a minimalist! Vertical running bond, laid in a staggered pattern. Horizontal running bond, with double tiles in each line – does the caption make sense? The pattern looks great I think! Classical herringbone, laid vertical and horizontal – it defines a direction in the space. Great for kitchen backsplash. A classical herringbone pattern – looks amazing, always. However I find this the most difficult, in terms of laying (Lots of cutting, and keeping horizontal and vertical lines can be tricky.) It is an other question, would you cut the top row to have a horizontal line, or would you prefer the zigzag? A herringbone-like subway tile pattern – examples included for this one. I think this is a grerat pattern, if you love both horizontal and vertical running bond!


So, in this post, I’ve collected 8 inspiring subway tile patterns — from the beloved classic brick bond to more creative mixed pattern layouts, to herringbone or vertical stacks — complete with real-life examples and layout ideas.
We’ll also talk about how to choose the right grout size for subway tile, because that tiny gap between tiles affects not just the overall look, but also the ease of cleaning and long-term maintenance.
By the end, you’ll be able to mix function with design — and find the perfect pattern that fits your style and your bathroom’s proportions.
Why Subway Tile Patterns Matter
Subway tiles are one of those timeless materials that never go out of style — but the pattern you lay them in completely changes how they feel. In a small white subway tile bathroom, that’s even more important. The right tile pattern can stretch your walls, calm the visual noise, or highlight the details you love most.
Patterns define how we perceive space. A horizontal layout can make your bathroom feel wider, while vertical stacking draws the eye upward, adding height. A herringbone pattern introduces movement and texture, turning plain white tiles into a subtle design feature. And if you’re going for a minimalist, spa-like feel? A classic brick bond or stacked layout keeps everything simple and serene.
As an architect, I like to think of tile layout as the rhythm of the room. It sets the pace — calm and structured, or lively and playful. It can hide uneven walls, visually zone different functions (like a shower vs. vanity wall), or even emphasize a focal point, like a mirror or window.
And here’s something many people overlook: tile patterns and grout size go hand in hand. Some layouts need wider joints to “breathe,” while others shine with razor-thin lines that make the tiles melt together.
Your choice here influences not only design but also maintenance — and the long-term harmony of the space. (We will cover that after the patterns!) In short: subway tile patterns matter because they’re the quiet framework behind every beautiful bathroom photo you’ve ever pinned.
Subway Tile Patterns – unique subway tile layout Options for White Tile
1. Running Bond / Brick (Traditional)
Classic offset pattern (half-tile shift). Timeless, hides imperfections well, easy to install. Works anywhere. Take a look at my gallery of small bathroom subway tile inspiration!
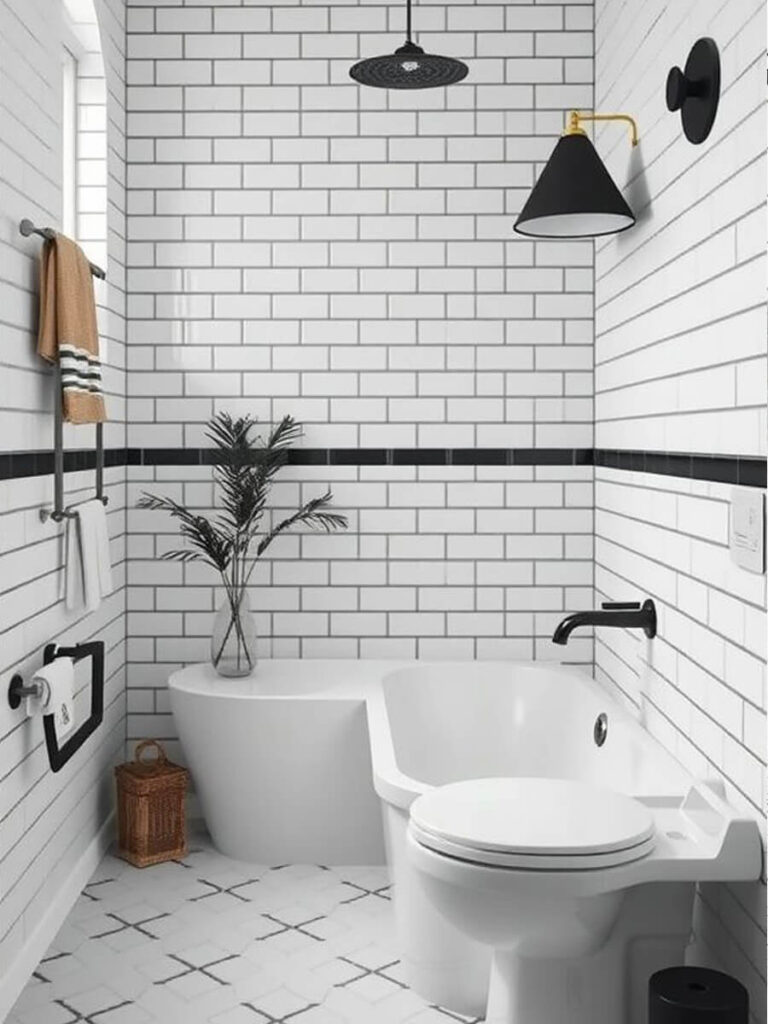
Crisp white subway tiles with black grout, accented by black fixtures, monochrome lighting, and a stylish corner tub in a modern space. Found it on Pinterest 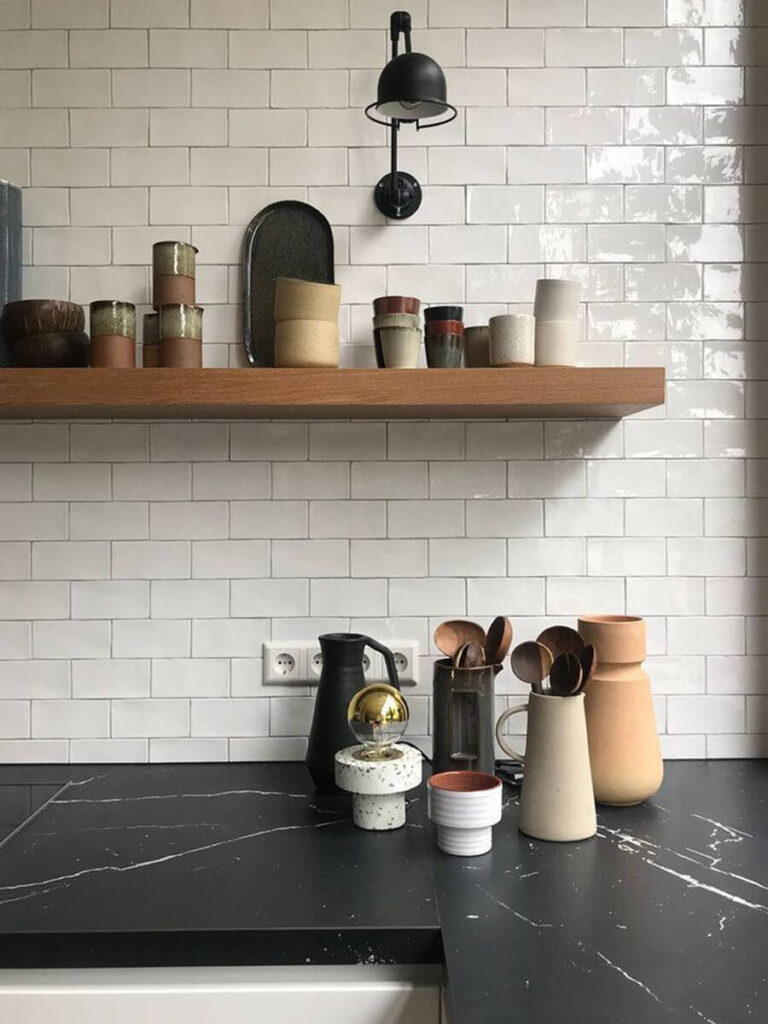
Contemporary kitchen: running bond subway tile with chic white grout, black lighting, wood shelf, and artisan ceramics for a refined style. Project by Form makers interior design studio. 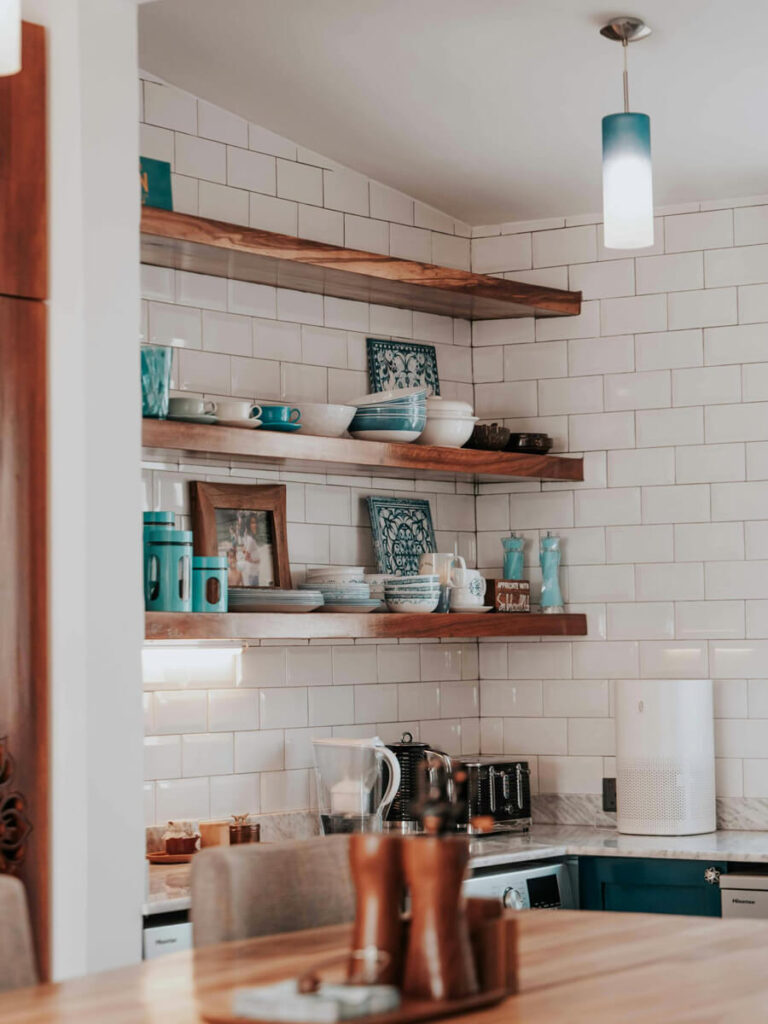
Inviting kitchen with running bond subway tiles, white grout, wood shelves, and turquoise accents for a comfortable, fresh look. Foto by Keegan Checks on pexels
2. Vertical Running Bond / Vertical Brick
The classic subway tile pattern rotated by 90°. Classic but with a twist – it works well on larger or smaller surfaces. It visually makes the space higher – better to think about what is your design goal, how high is your room, or if it a good idea to reach the ceiling. I like it a lot!
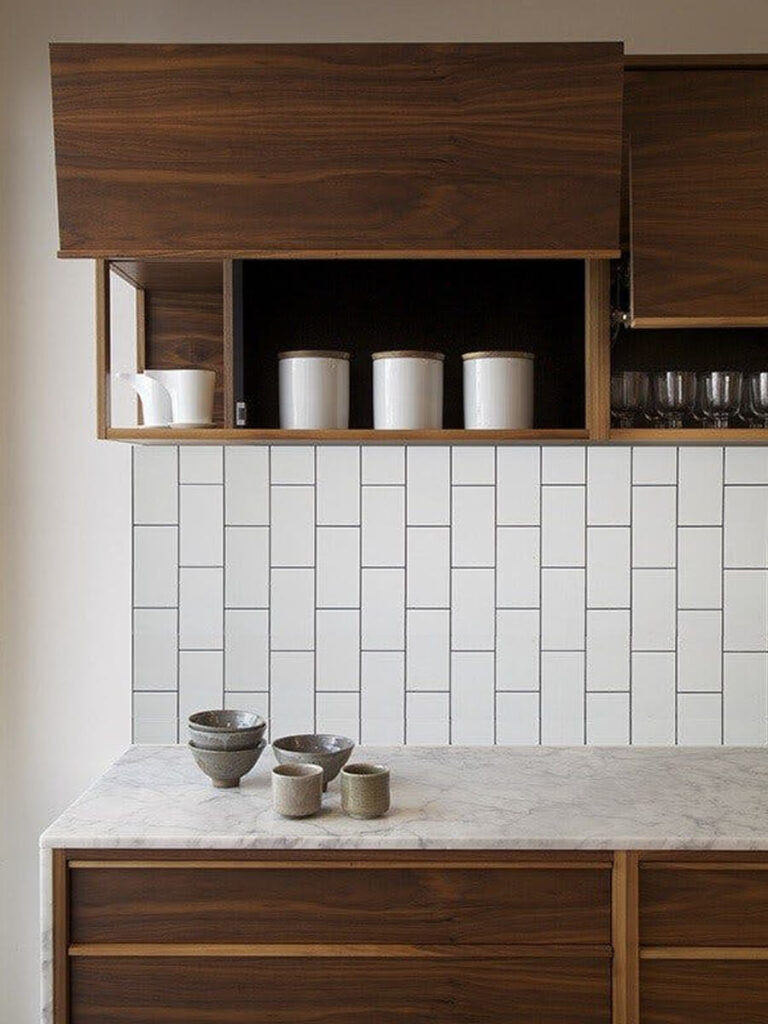
Classical subway tile pattern with a 90° twist! The vertical running bond layout is a smart way to your kitchen an elevated look. The crisp grout lines emphasize each tile, while the warmth of wood cabinets and natural ceramics adds a cozy but modern touch. 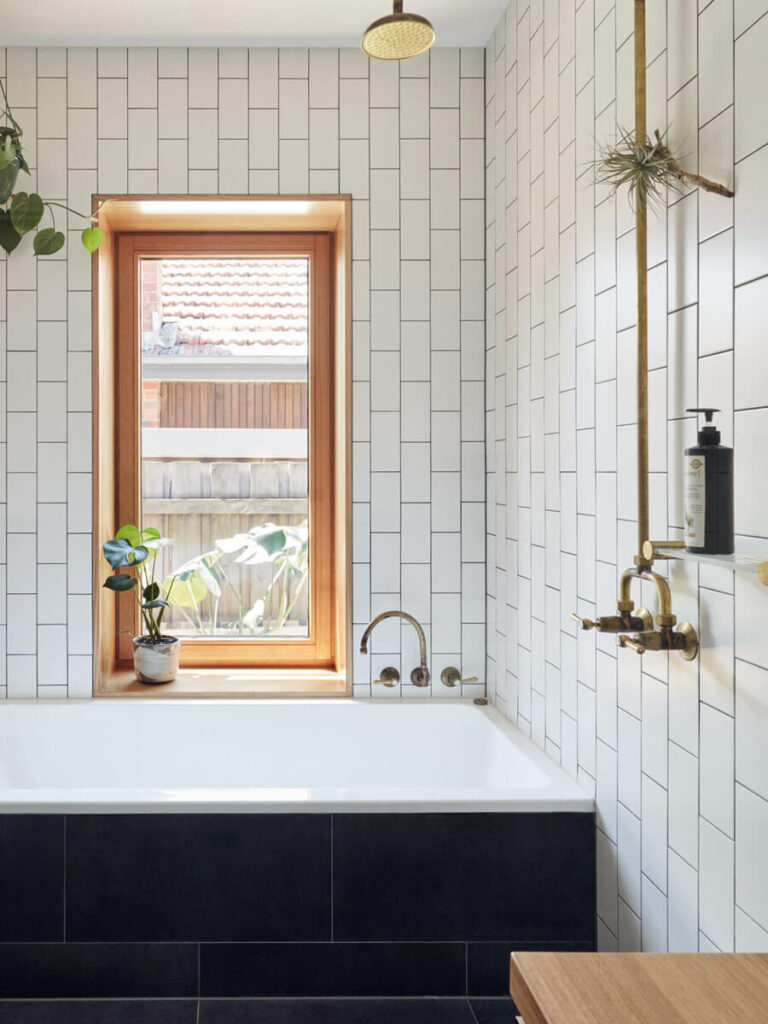
For an easy, orderly tile layout, vertical running bond keeps bathrooms feeling clean and elongated. A project by Breathe studio.
3. Horizontal Grid Pattern (Classic)
Tiles aligned in a simple grid. Clean, modern, and makes small bathrooms feel wider. Works great with minimalistic style.
This is the final layout for our small bathroom remodel with shower only!
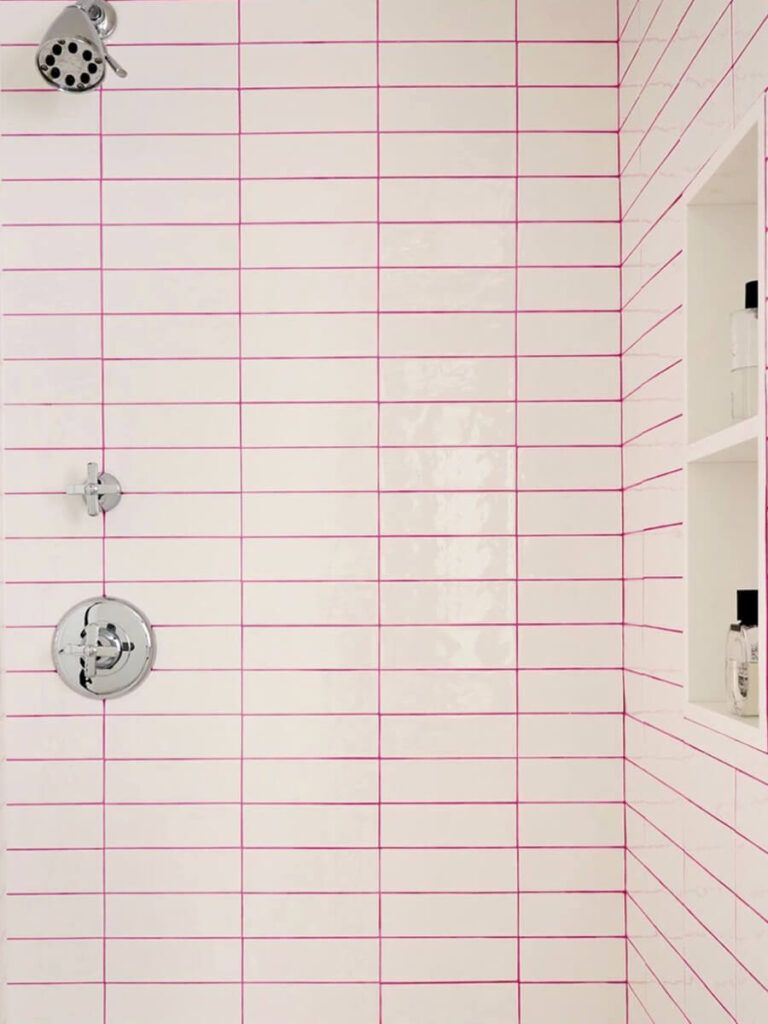
Contemporary shower: pink grout on horizontal tiles and sleek metal fixtures blends playful and modern elements. A project by Hilary Matt. 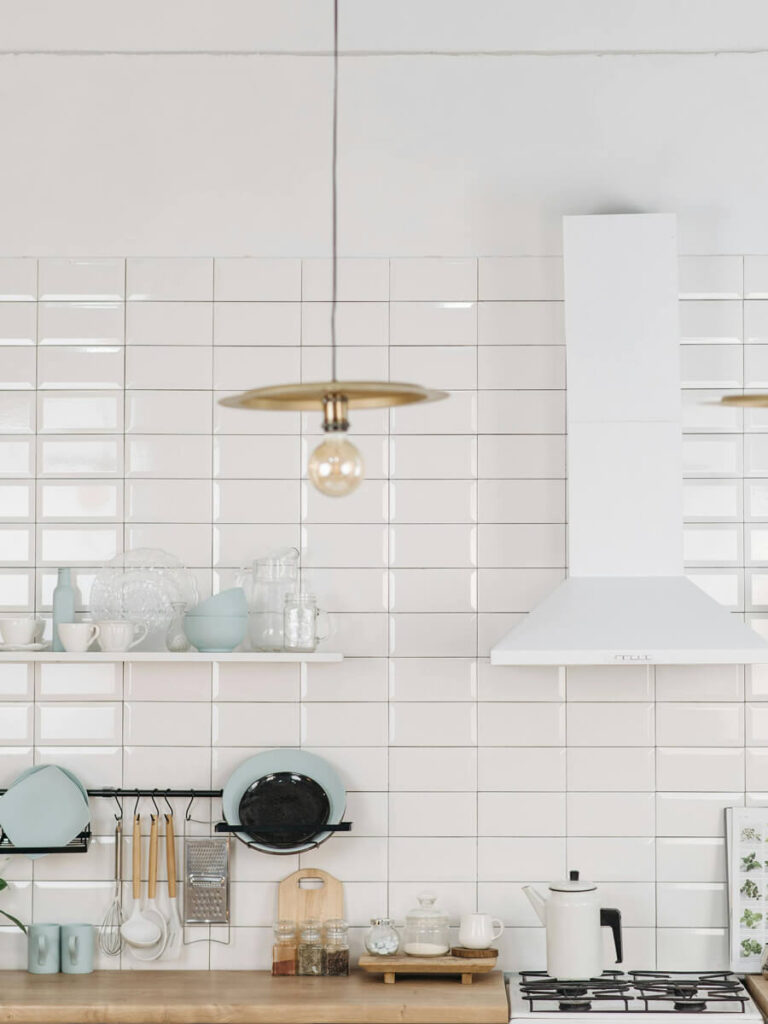
Kitchen design: white tiles with grey grout, open shelving, and blue accessories for a stylish, functional cooking space. Photo by Pavel Danilyuk
4. Vertical Grid Pattern
Tiles stacked vertically. Good for low-ceiling bathrooms to emphasize height. Adds a contemporary, bold vibe.
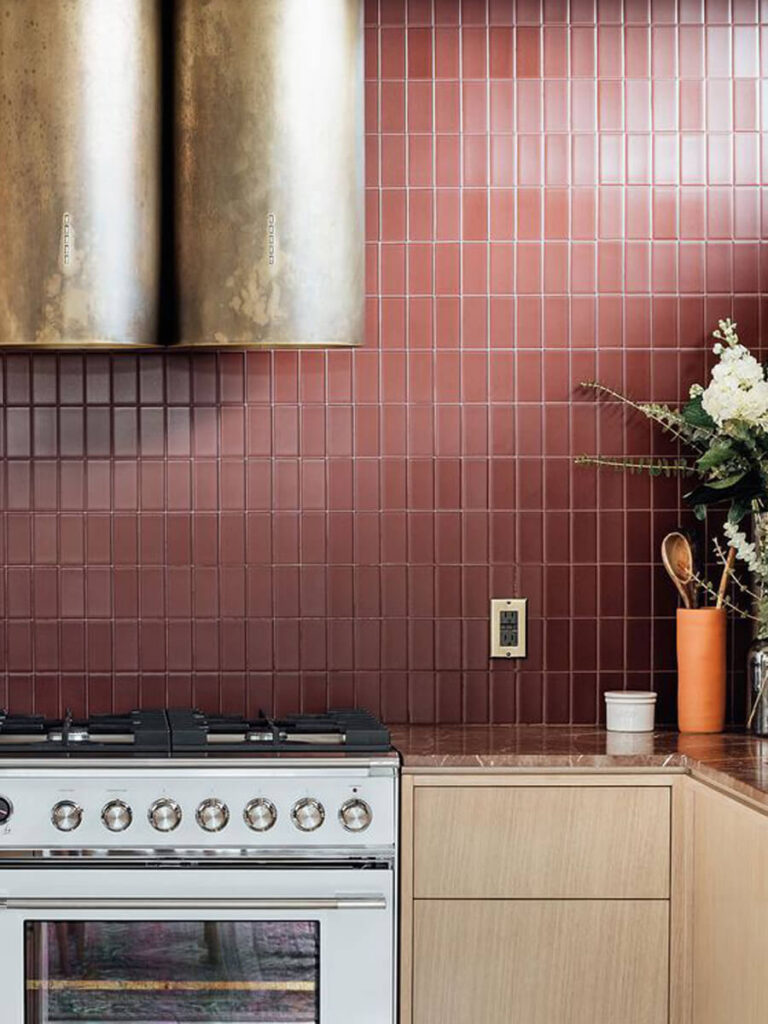
Warm and welcoming kitchen: vertical brown tile grid with bronze hardware and soft wood for a cozy, inviting style. A project by Cityhome collective. 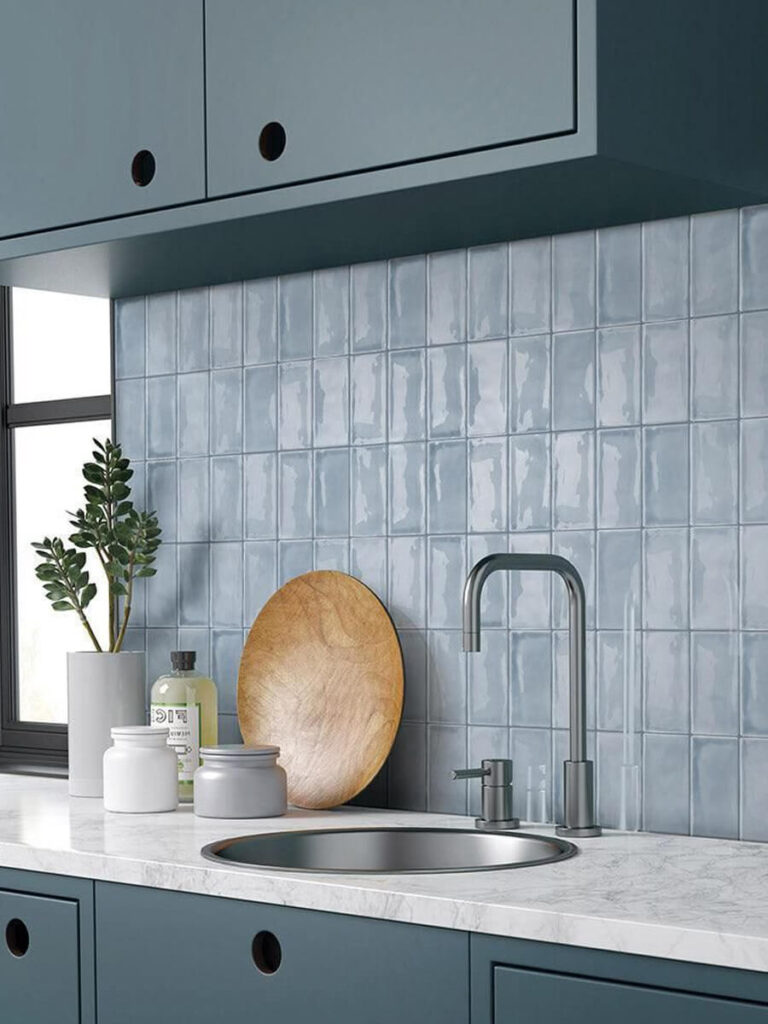
Cool-toned kitchen with stacked blue grid tiles, matching cabinets, and marble counters for a modern coastal effect. Source 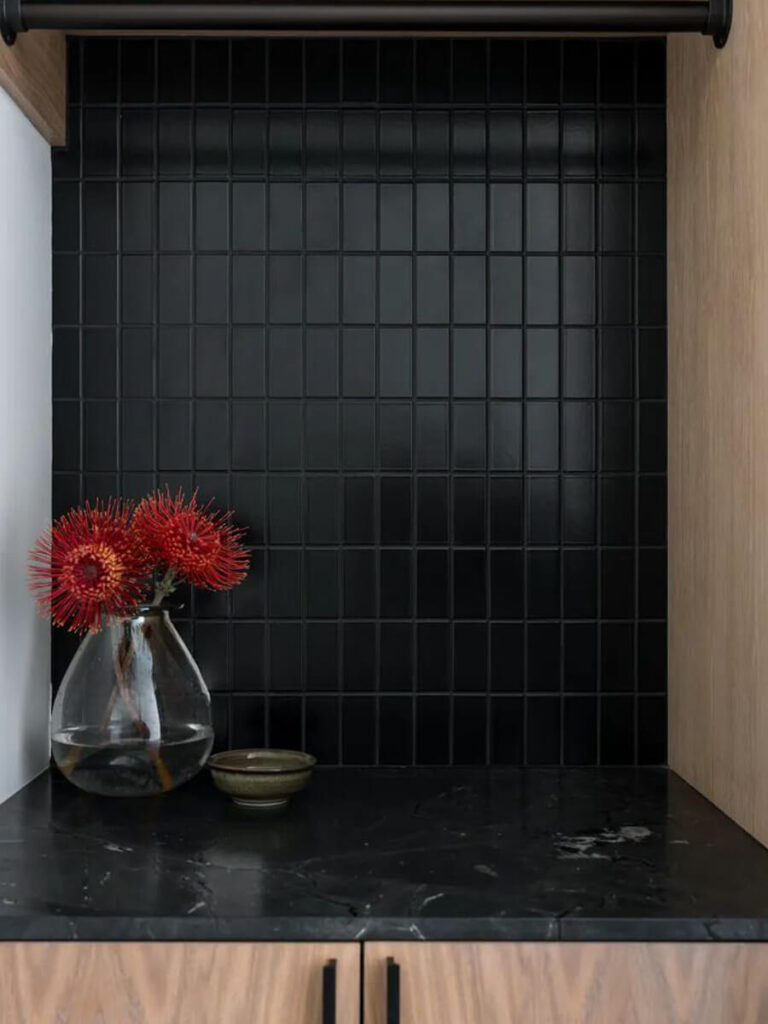
Striking backsplash: vertical grid of matte black tiles paired with wood finishes and bold floral accents for a modern, luxe kitchen design. Source 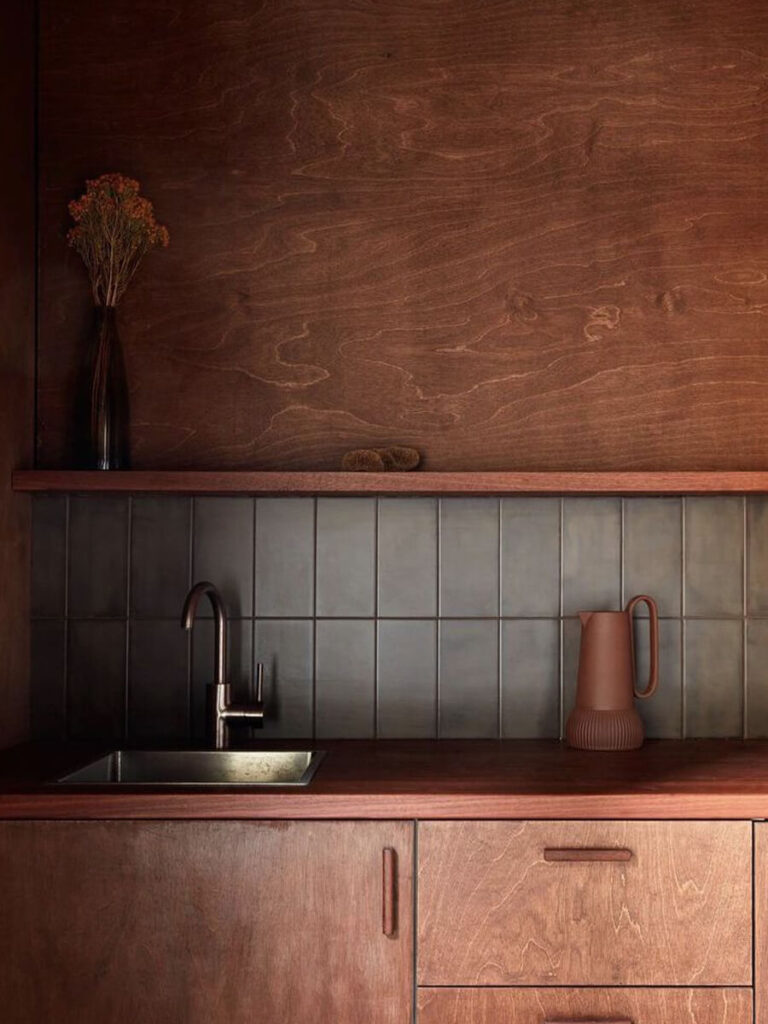
Sophisticated kitchen: vertical matte grey tiles, wood cabinetry, and brass hardware create a moody, refined space. A project named Shadow House by Grotto. 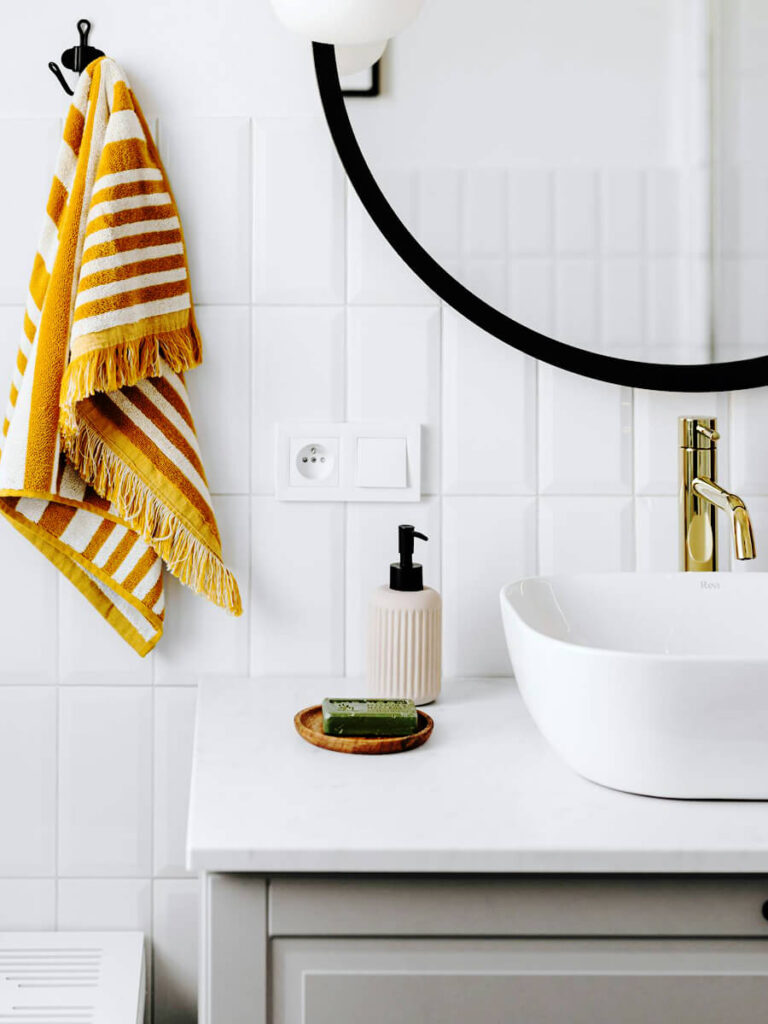
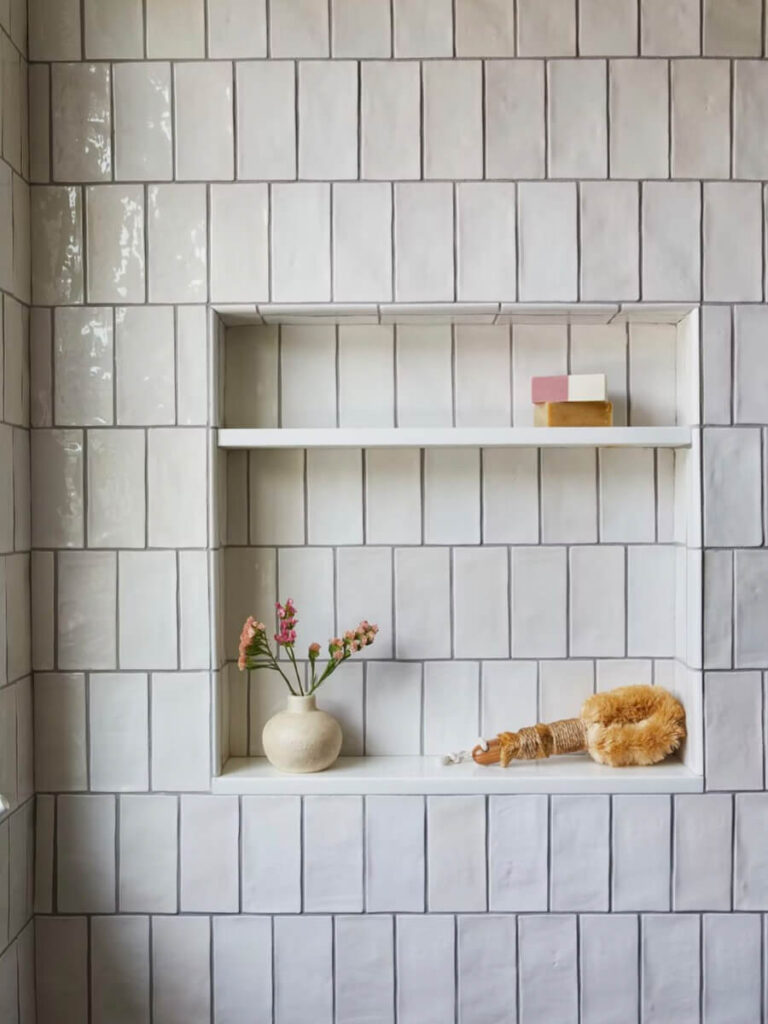
This fresh bathroom corner plays with simplicity: white subway tiles and clean white grout. The beveled tiles and the vertical grid add an extra to the simple pattern. A photo by kaboompics on pexels.
5. Vertical Running Bond
Tiles stacked vertically but offset slightly like a brick. Combines height emphasis with softer rhythm.
Soothing washroom design: vertical running bond white tiles and matte surfaces set a calm and inviting mood. A project by julialongchampsdesign 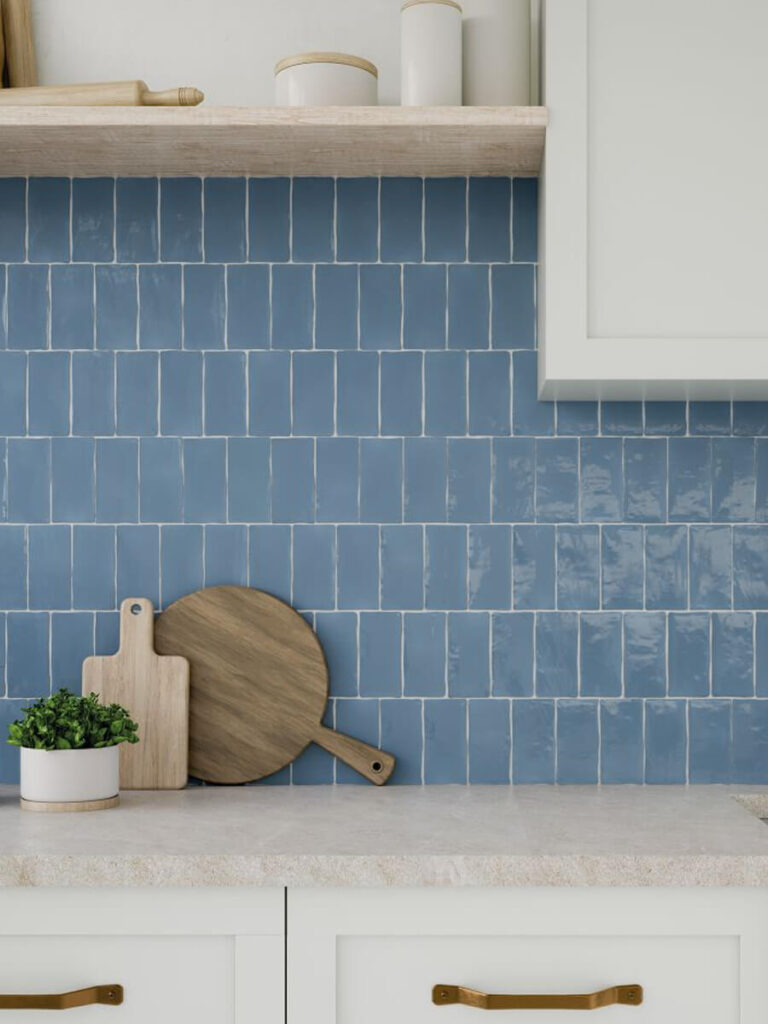
Glossy blue tiles arranged in a vertical running bond give this kitchen a fresh spin. Paired with wood cutting boards and soft white cabinets, the space feels airy and welcoming—great for relaxed breakfasts or late-night snacks. Source 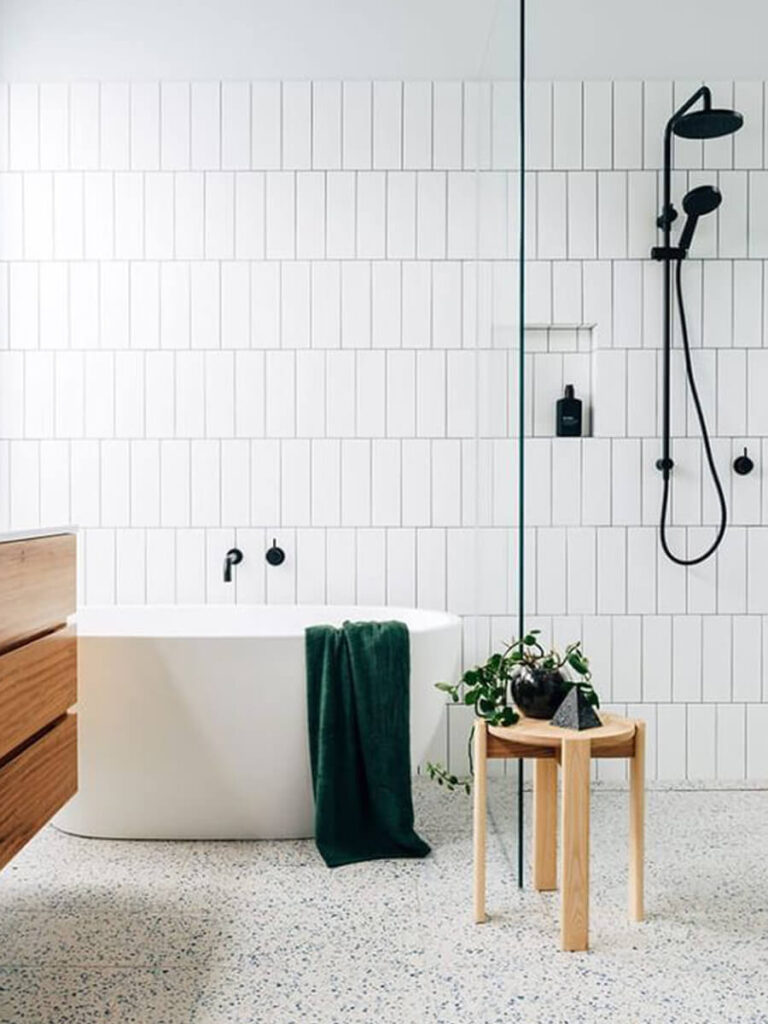
Modern bathroom look: horizontal white tiles with grey grout, dark hardware, wood furnishings, and speckled terrazzo flooring. Take a look at the vertical runing bond battern! Lena Bruno 
Modern shower area: vertical white tiles with subtle grey grout, steel fixtures, and integrated shelf for a stylish, functional finish. Design by Mokume Design Studio and photos by Christopher Stark
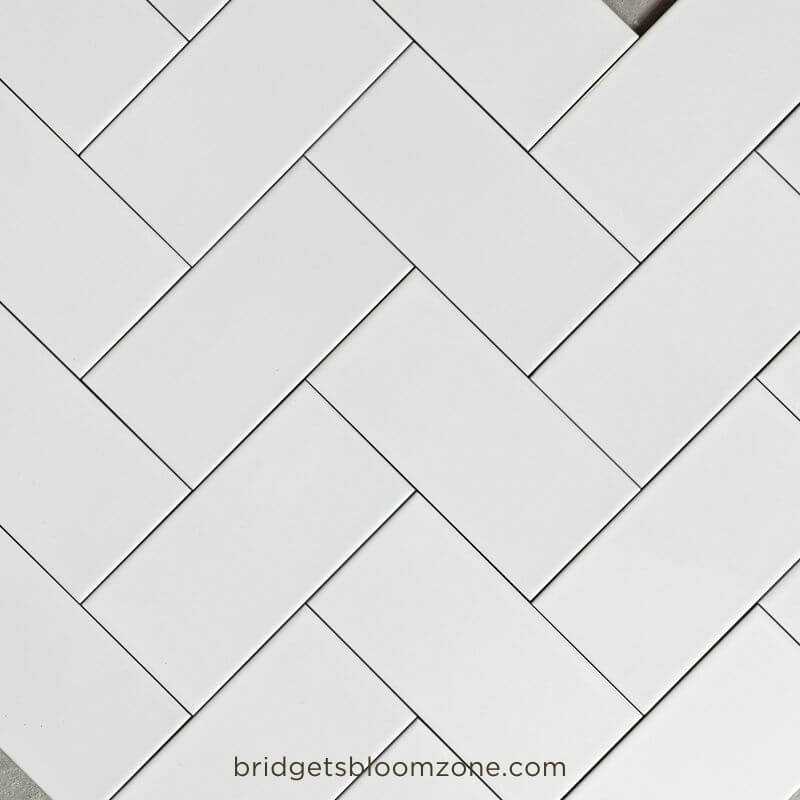
6. Herringbone – Classical
Diagonal zigzag layout. Adds movement and energy. Best for floors or small accent areas, not entire small bathroom walls.
Bright kitchen with herringbone pattern tiles, terrazzo counters, sleek blue cabinets, and chrome hood, for a clean and refined contemporary design. Source 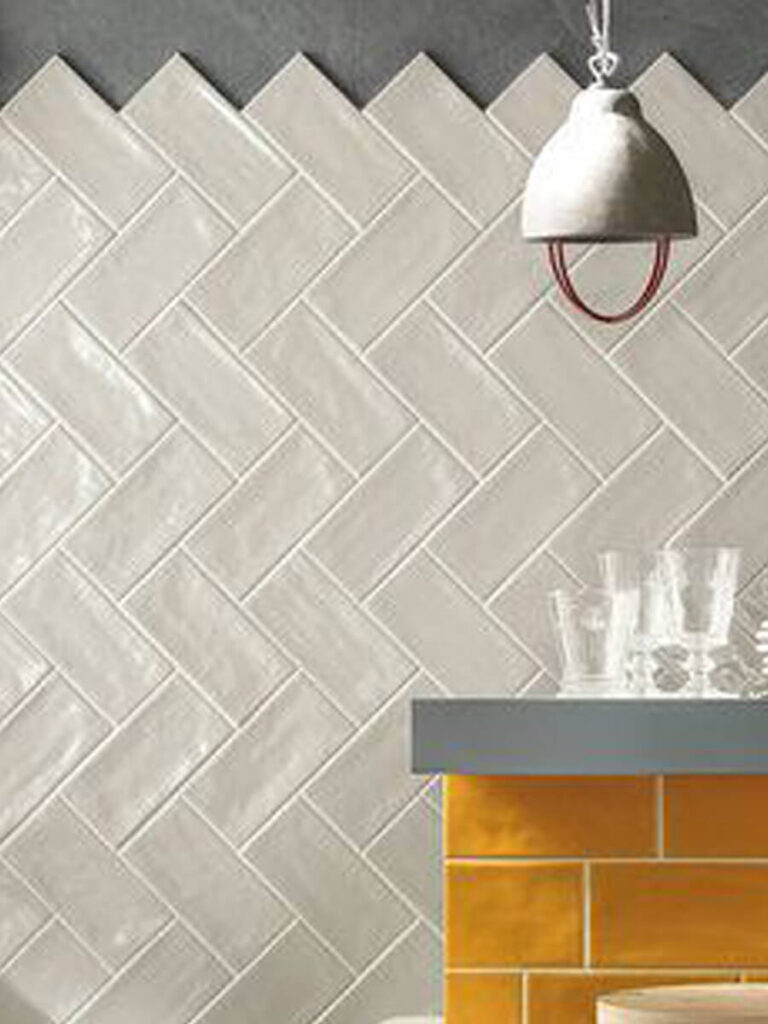
Stylish herringbone tile backsplash with zigzag edge, paired with mustard yellow stacked tiles and a minimalist grey pendant for a bold kitchen accent. Source Herringbone, red grout and greenery mix for a fresh and energizing bath. That is a statement here! Source
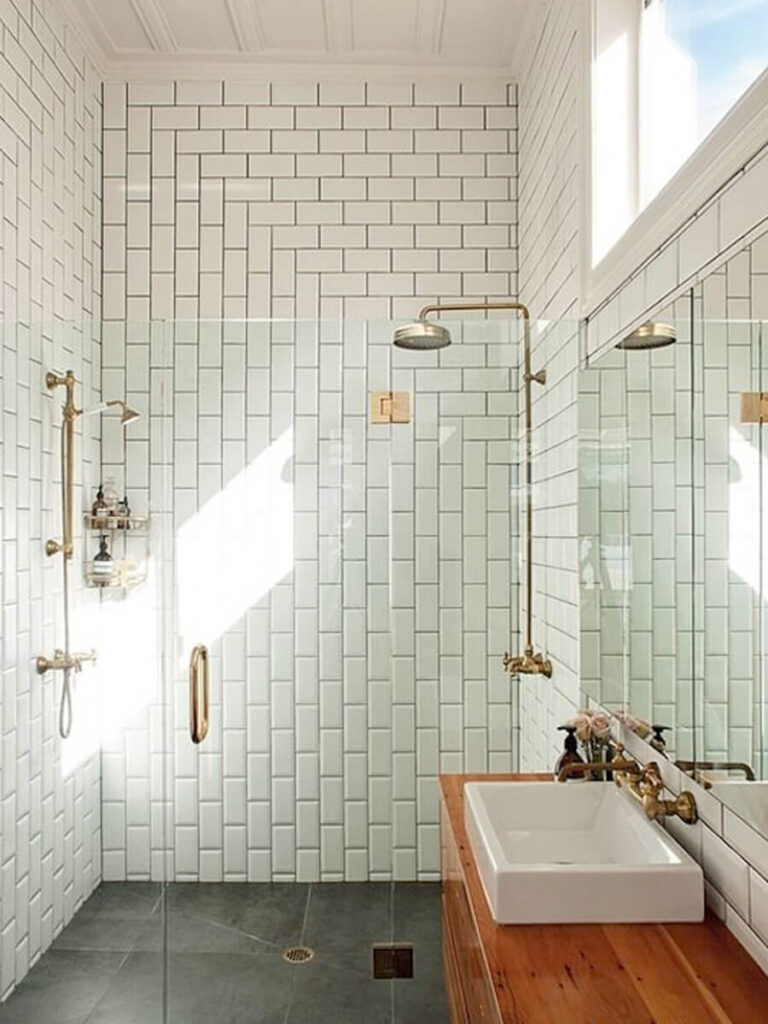
7. Herringbone – Rotated
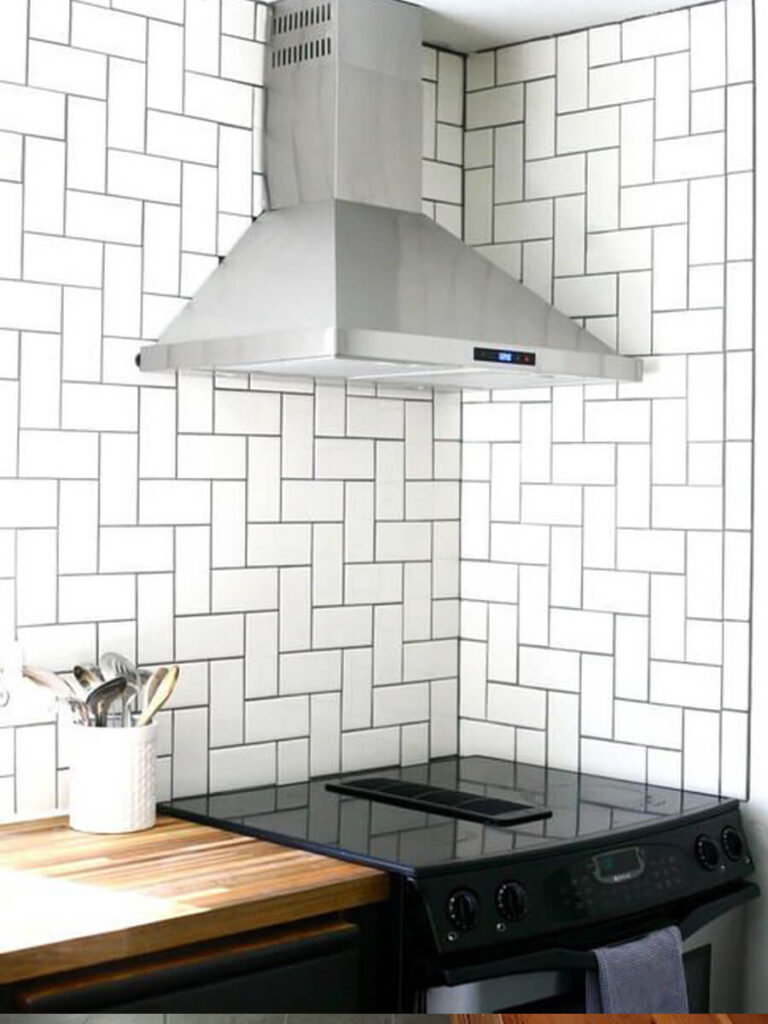
Diagonal zigzag layout – but horizontal and vertical tiles form a stairs-like structure. Adds movement and energy, but stays more grounded. Best for smaller surfaces like above kitchen cabinets or accent walls in bathrooms. In small spaces, using only this pattern will create noise – use it on accent walls only, in bigger spaces.
Vertical herringbone tile and a giant round mirror create a sense of space and pattern in this bathroom. Paired with brass accents and lush greenery, it’s a modern yet welcoming take on spa-inspired design. Found it on Pinterest – but I am curious, who is the architect! Laying subway tiles in a herringbone pattern is a fun way to break away from the ordinary—this bathroom pairs it with a shower niche lined in mosaic for extra dimension. Yellow textiles add a sunny, inviting feel. Source If you want your backsplash to be the star of the kitchen, go for a vertical herringbone pattern like this. The glossy white tiles shimmer behind the stove and the countertop utensils give it a ready-to-cook, contemporary vibe. The dark grey or black grout emphasizes the unusual pattern. Found it on Pinterest.


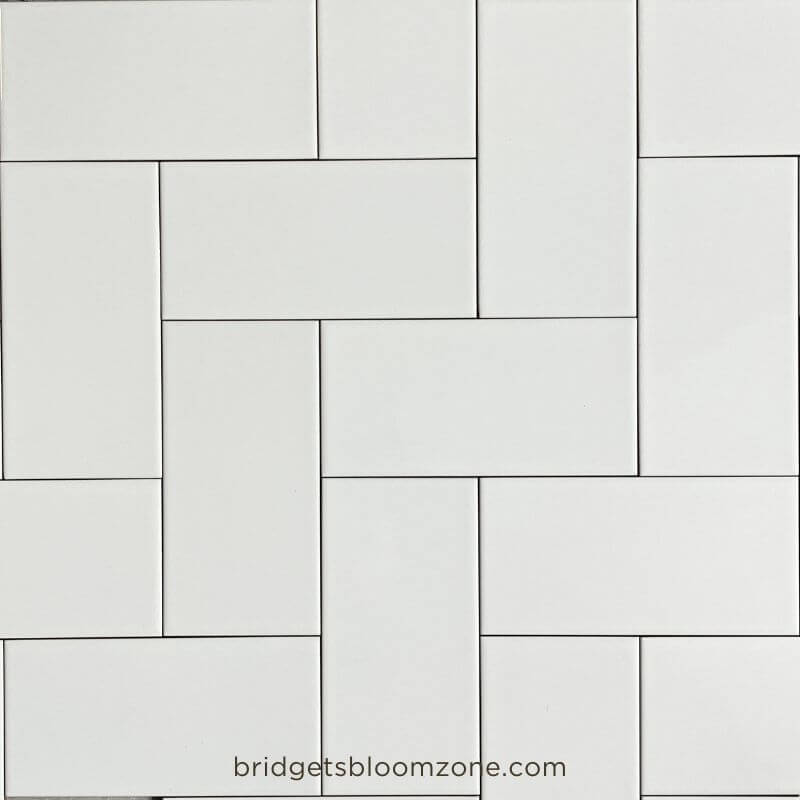
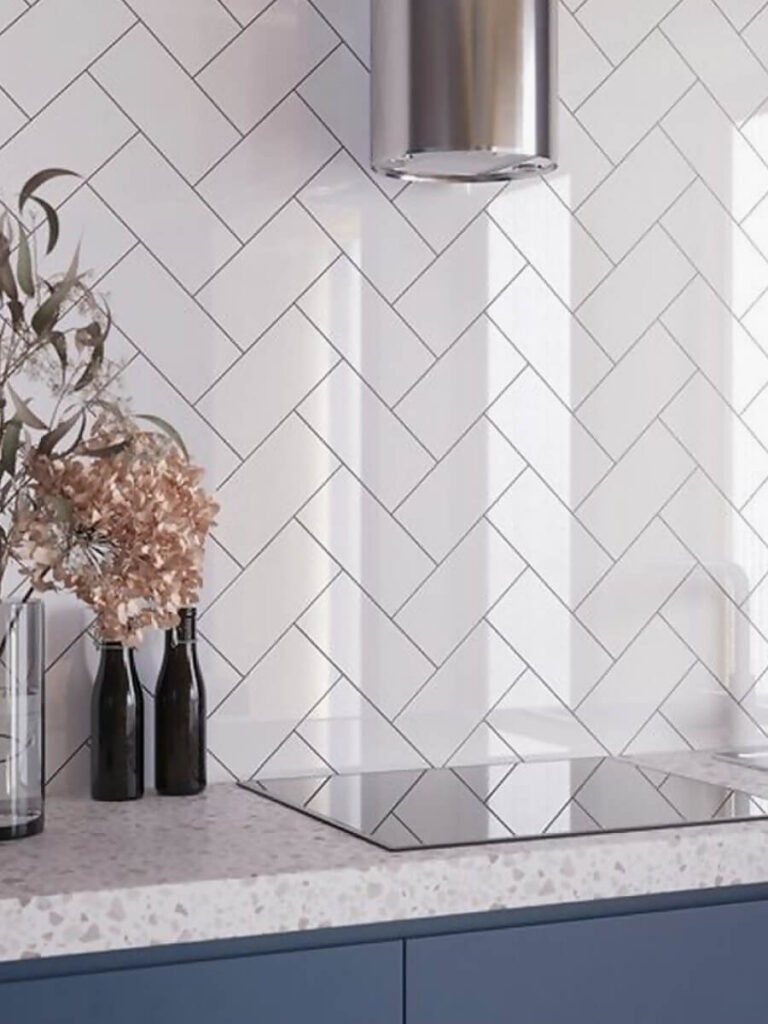
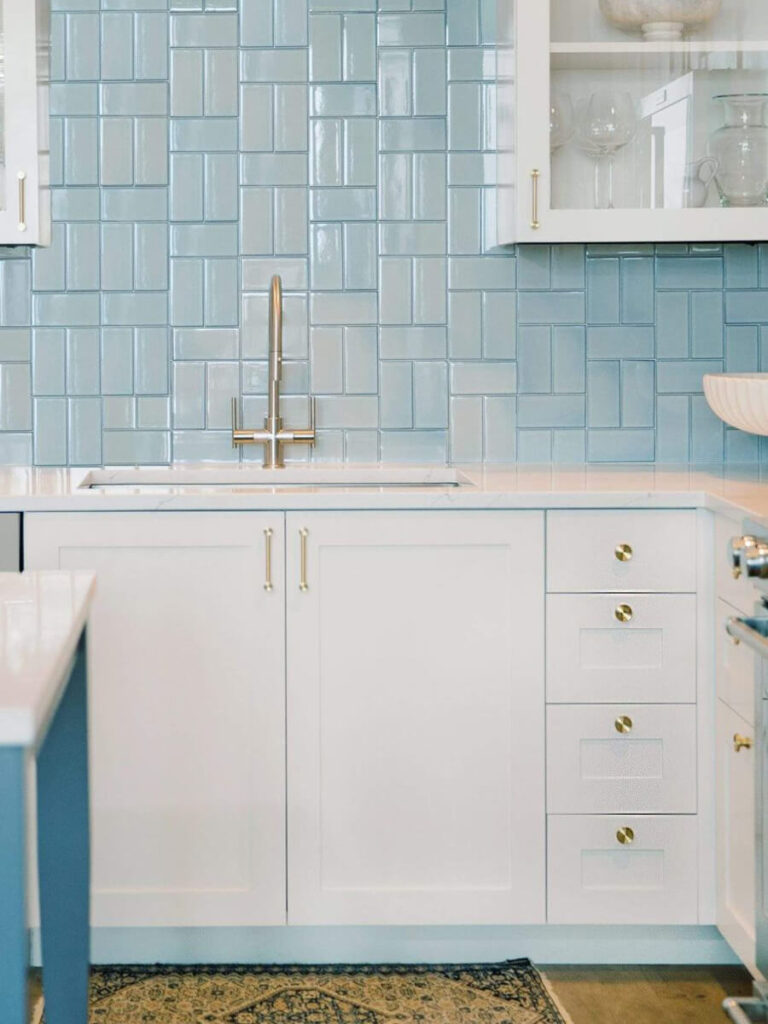
8. Herringbone – Mixed Horizontal and Vertical
You can’t decide between horizontal running bond or vertical running bond? It is possible to choose both at the same time! The two patterns can unite in a herringbone-shape on one wall. The tiles do not repeat a pattern but they create lines on walls. Great for retro looks on walls and floors.
This bathroom showcases how horizontal running bond and vertical running bond can unite into a huge, rotated herringbone tiling! With it you can create drama and height, and combine the two effect in one space. Found it on Pinterest. 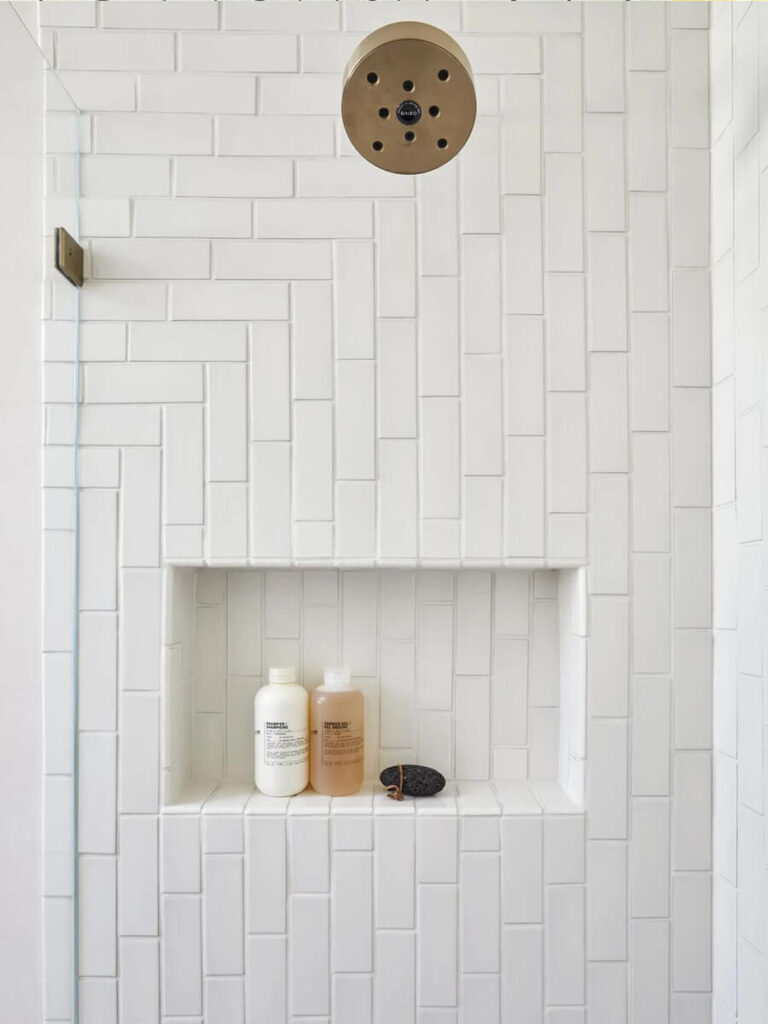
The vertical herringbone pattern turns an everyday shower into a design feature—arranged vertically, the pattern draws the eye up while keeping things sophisticated and serene. This is not the classic 1:2 ratio subway tile, but the concept is usable as well! Design: Cathie Hong Interiors, image: Margaret Austin Photography
9. Basket Pattern – 2×2 Horizontal and Vertical Combined
Small tiles combined to create a repeating square or basket effect. Fun for floor patterns, retro feel. Or when you want to emphasize a playfulness in your clean and minimal bathroom, letting the grout be the decoration.
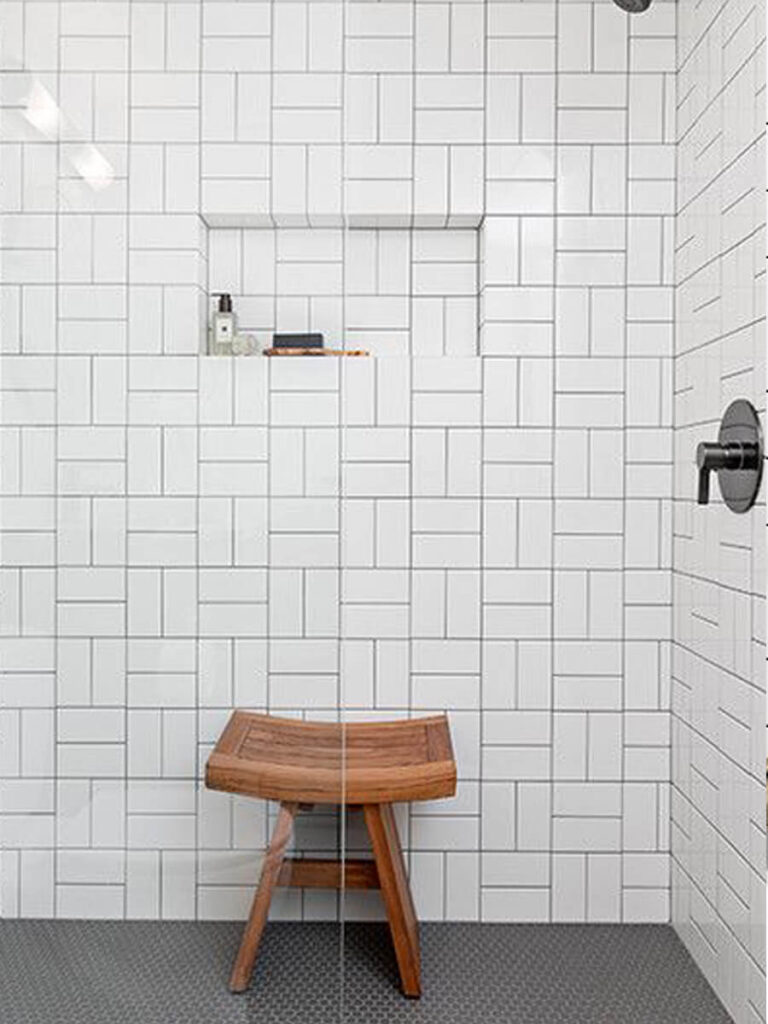
The basket weave tile pattern in this shower is a real standout, adding instant texture without crowding the space. A clever built-in shelf and soft modern touches make it practical, too. Found it on Pinterest. 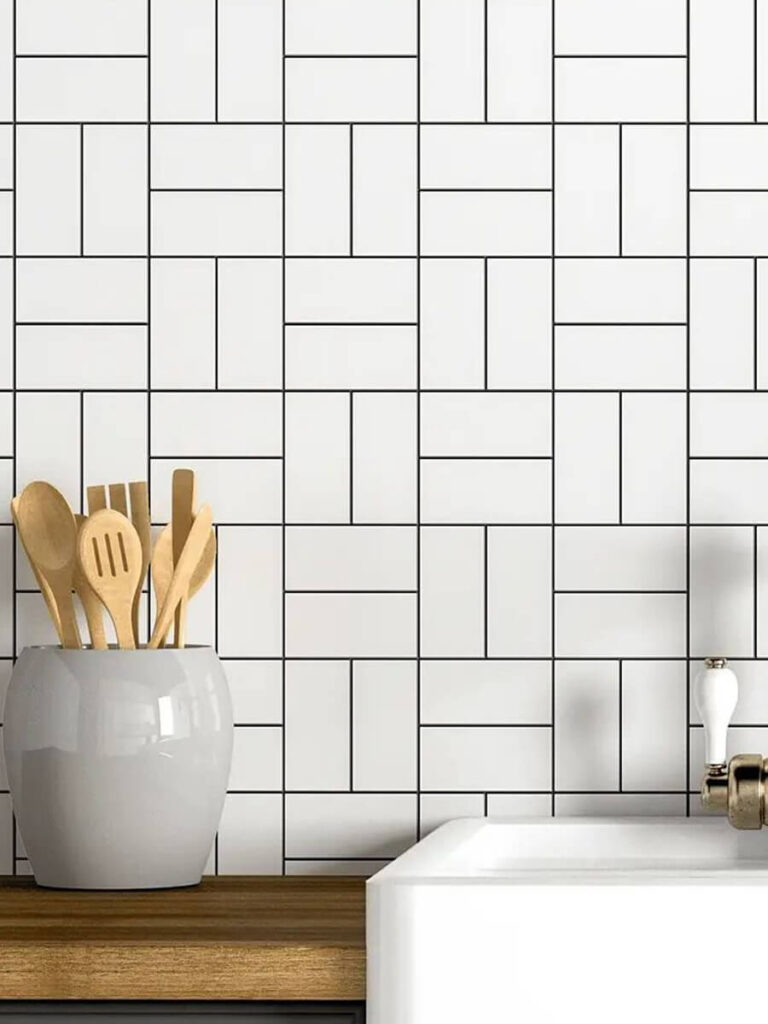
White basket weave tiles laid out in black grout make the kitchen feel bright but full of detail. This pattern brings in visual rhythm, and styling with a few wood or ceramic pieces makes it pop. Found it on Pinterest.
10. Basket Pattern – 3×2 Horizontal and Vertical Combined
The proportion is not 2×2, but 3×2 is this subway tile pattern. It is a repeating square or basket effect. Fun for floor backsplashes or showers, it has a unique look. Still harmonious and homogenous pattern
A light blue 2×3 basket weave backsplash transforms this kitchen, giving subtle texture and movement behind the sink. Paired with glass-front cabinets and a hint of brass, it’s a cool, refreshing take on subway tile done a bit differently. A project by Etch Design Group. The 2×3 basket pattern offers a creative twist on the classic subway tile patterns —perfect for kitchens that want to show off a bit of personality. Paired with dark or contrasting but minimal cabinetry and brass accents, this look feels both lively and polished. Foto by Inga Seliverstova on pexels.
+1 Subway Tile Combined with Squares, Colors
Mostly classic grid with occasional colored tiles inserted. Or combined with different proportions, but compatible sizes. Adds personality without overwhelming space.
This cozy kitchen detail mixes up subway tile patterns behind a matte black cupboard. The way of laying tiles is simple here: 4 full subway tiles with a half subway tile create a larger square, and those squares repeat. Perfect for anyone who loves a dash of visual interest by the sink or prepping area. 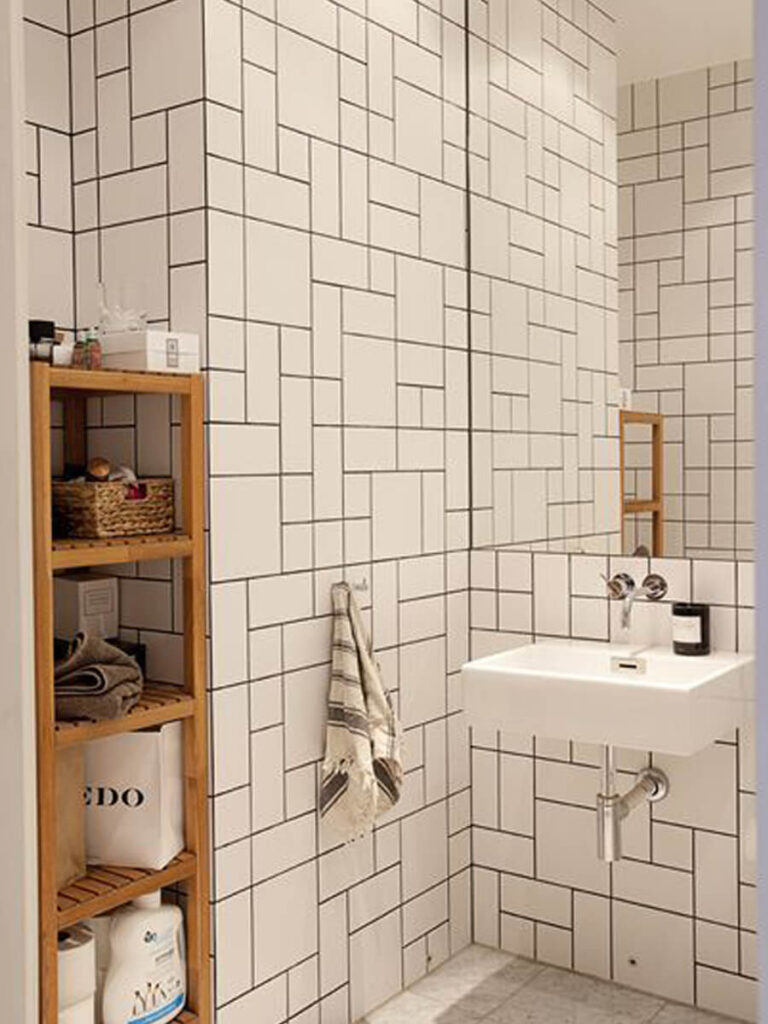
Geometric bathroom walls with subway tiles mixed with squre shaped tiles. The black grout, and sleek finishes give a crisp, artful design, still create a calm look. 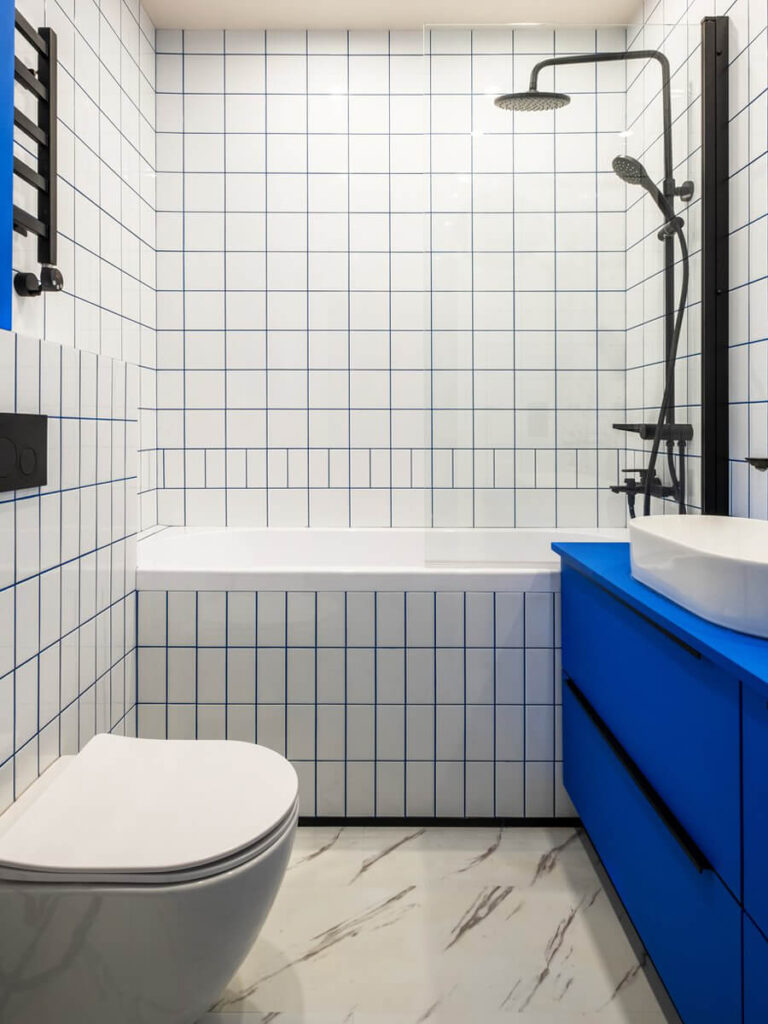
Vibrant bathroom: mixed subway grid with blue grout, blue vanity, and black hardware give a lively designer edge. The white subway tile with white square tiles get a playful look. Source
Things to Consider Before Choosing a Pattern
Choosing between different subway tile patterns may seem like a purely aesthetic decision, but in reality, it shapes the atmosphere, proportions, and even functionality of your space. White tiles are timeless — they’ve been the quiet heroes of interiors for more than a century — yet the way you lay them defines whether your bathroom feels calm, bold, modern, or vintage.
Before you fall in love with a Pinterest photo, here’s what to think through carefully.
1. Define Your Design Goal
Start by asking: What mood do I want this space to have?
Is it calm and minimalist, or do you want a bit of creative tension?
A classic running bond feels timeless and cozy, great for traditional or Scandinavian interiors. A vertical stack feels modern and architectural, while herringbone or chevron patterns add playful energy and movement. For retro bathrooms, even small tweaks in layout — like offsetting rows slightly — can evoke early 20th-century charm.
Your chosen subway Tile pattern should reflect your style keywords — just like my design words funny, smart, cozy, minimal. They serve as a compass that keeps every choice intentional.
2. Proportion, Space & Balance
In small spaces, pattern size matters. A small white subway tile bathroom looks cleaner and calmer with simple, structured layouts, where your eye isn’t distracted by too many lines. Larger bathrooms can handle more intricate designs, like herringbone or double basketweave, that visually fill the space with texture.
Also, consider the tile-to-paint ratio: how much of your wall is tiled, and how visible do you want it to be? If tiles cover only half the wall, you can go bolder with the subway tile pattern to make it a design feature. But if the whole wall is tiled, simplicity usually wins.
3. Grout Color & Line Visibility
Your grout color dramatically affects how visible the pattern appears.
Light grout blends with white tiles, creating a seamless, calm background. Dark or contrasting grout emphasizes geometry, turning the tile layout into a strong visual feature.
So before deciding on your pattern, visualize whether you want your walls to look like a continuous surface — or like a beautifully drawn grid. If you choose dark grout in a small bathroom, for instance, you’ll instantly draw attention to the layout — a striking effect if done with intention.
An other important question is, how to add color to a bathroom? Here you can read more about how to create color harmonies in a small bathroom.
Industrial-style shower with black hardware, white subway tiles, striking dark grout, and bold greenery creating a modern, fresh look. Source: bathroom by @homeonstephens 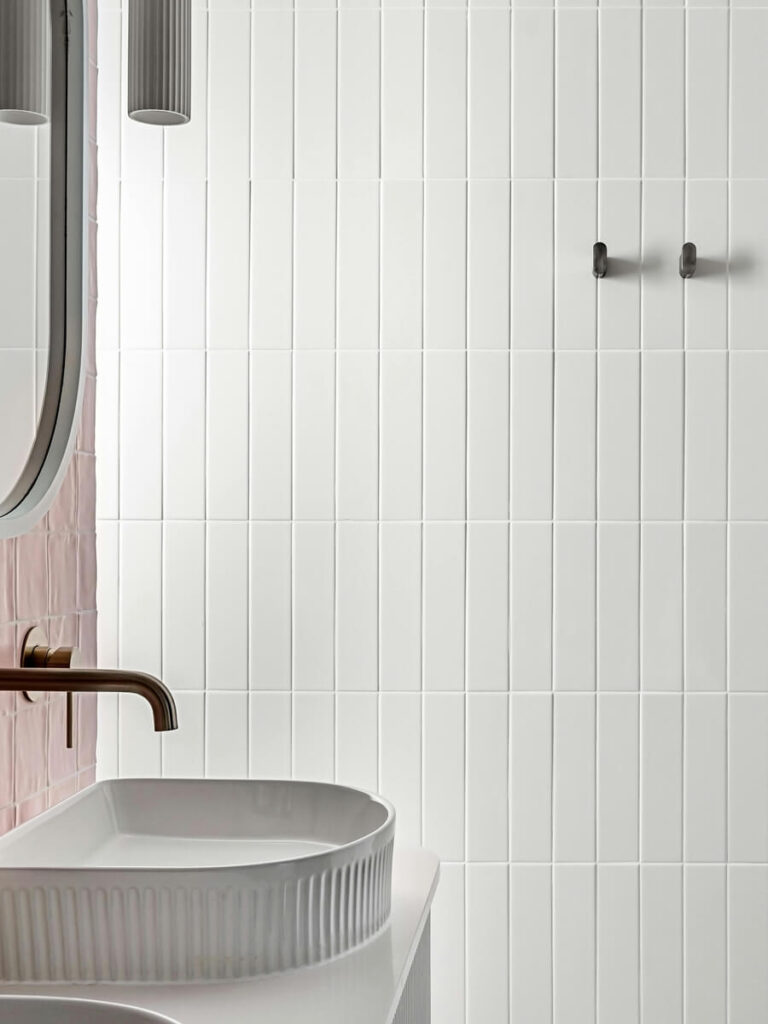
Clean modern space: white grout on vertical tiles creates a serene, streamlined aesthetic, paired with soft-toned fixtures for calm. Phot by Lisa Anna.
4. Function & Focal Points
Different Subway Tile Patterns can also define zones in your bathroom or kitchen. For example:
- A vertical stack behind a mirror emphasizes height.
- A herringbone in the shower niche adds texture and contrast.
- A classic horizontal layout behind the vanity keeps things calm and cohesive.
Think about where you want to lead the eye — and where you want it to rest. The pattern can act like invisible architecture, shaping perception and rhythm.
5. Installation & Maintenance Practicalities
Not every layout is equal in difficulty (or budget). Simple stacked or brick layouts are easier and faster to install, while diagonal or intricate patterns require more cutting and precision — meaning higher labor costs.
Also, keep in mind grout joint size: tighter joints look sleek but demand perfect tile alignment; wider joints add softness but require more maintenance. The grout size and pattern work together to define the overall harmony of your bathroom.
In short: Choosing your Subway Tile Pattern is a blend of proportion, mood, light, and function. Once these factors align, even the simplest white tile wall can feel like a bespoke design feature.
How to Choose Grout Size for Subway Tile
When planning your Subway Tile Pattern, the grout size might seem like a technical afterthought — but it actually changes the entire look and feel of your bathroom. It defines the rhythm of your walls, how “busy” or seamless the surface appears, and even how easy it will be to clean later.
In short: your grout lines are part of your design language.
Let’s see how different grout sizes work, and when (and where) to use each.
Grout Size > 3 mm — Wide Gaps, Strong Character
Wider grout joints (anything above 3 mm) instantly add texture and rhythm to your tiling. The eye catches the grid, the layout becomes a statement, and the grout color starts playing a starring role.
If you want to emphasize your subway tile pattern — for example, a herringbone layout with contrasting grout — a slightly wider gap can look artistic and intentional.
But here’s the catch:
- Maintenance: Grout is more porous than ceramic, meaning it absorbs water and dirt easily. The wider the joint, the more cleaning you’ll need.
- Hygiene: In bathrooms or kitchens, it’s not ideal. Larger gaps can trap moisture or mold, even with good sealant.
That’s why I’d reserve this option for decorative walls, entryways, or accent areas, where hygiene isn’t critical. Think foyer walls, mudroom backsplashes, or creative kitchen corners — where grout can safely be part of the design show.
3 mm > Grout Size > 1 mm — The Sweet Spot
For most white subway tile bathrooms, this is the golden range.
Gaps between 1 and 3 mm give you the best of both worlds: clean lines, subtle definition, and a finish that’s easy to maintain.
Here’s how to think about it visually considering subway tile patterns:
- 1–2 mm grout looks minimal, calm, and seamless — especially when the grout matches your tile color. Perfect for a bright, airy bathroom.
- 2–3 mm grout works beautifully when you want to highlight the pattern or grout color — say, pairing white tile with gray, light blue, or even sage green grout. It gives personality without overwhelming the space.
A quick tip: grout in a contrasting color always looks a little thicker than it really is. So if you want a bold line but not a heavy look, you don’t have to go beyond 2–3 mm.
This middle range is also the most hygienic choice — small enough to minimize dirt build-up, but wide enough for proper sealing and flexibility during installation.
Grout Size < 1 mm — The Seamless (But Tricky) Option
Yes, it’s technically possible to install subway tiles with 0 mm grout lines, but it’s rarely recommended for bathrooms or kitchens. Why? Because those tiny gaps — or lack of them — don’t allow for sealing, expansion, or proper cleaning.
Without grout, even the smallest tile irregularities become visible. And worse — water can slip behind tiles, leading to long-term damage or mold growth.
However, there are places where the no-grout look works:
- Decorative walls or foyers where tiles aren’t exposed to water.
- Dry areas where you want a monolithic, architectural effect (like a continuous surface of white tile).
If you want that seamless aesthetic in a bathroom, you can fake it safely by using 1 mm grout in the same color as your tile — it looks almost invisible, but keeps things hygienic and protected. I would recommend to choose a different tile for this option, like 10×10 cm squares, or more slim tile sizes. It will look better.
My Takeaway for Grout Sizes of Subway Tile Patterns:
For most white subway tile bathrooms, a 1–3 mm grout line is the sweet balance — visually refined, practical, and timeless. It goes well with both flat and beveled tile. It complements both classic and modern subway tile patterns, letting the design breathe without constant upkeep.
I would not recommend 0 mm with beveled tile, and would be careful with the flat tile type.
If you’re after the calm, minimal look: go narrow and tone-on-tone.
If you want graphic character: go up to 3 mm with a contrasting shade.
And if you’re tempted by 0 mm? Keep it for dry, decorative zones only — your future self with a cleaning sponge will thank you.
FAQ – Choosing the Right Subway Tile Pattern
Which subway tile pattern is most popular in kitchens or bathrooms?
The most classic and timeless pattern is still the running bond (or brick pattern) — it’s the one you see in every charming old metro station. It works beautifully in both kitchens and bathrooms because it feels familiar, calm, and balanced. Still, more and more people experiment with stacked or vertical layouts for a cleaner, more minimal look — especially in small spaces.
How do I pick a tile layout that works for a small bathroom?
In a small bathroom, simplicity is key. Stick with patterns that create order and rhythm instead of chaos — like horizontal running bond or stacked horizontal. They visually stretch the walls, making the space feel wider. If you want to play with something bolder, use a statement pattern (like herringbone or diagonal) only on one wall — for example, in the shower area.
What grout line width is best for different subway tile layouts?
For most white subway tile bathrooms, a 1–2 mm grout line feels neat and modern. Go wider (2–3 mm) only if you want the grout color to become a feature itself. Remember: larger gaps collect more dirt, so consider maintenance, especially around sinks or showers. If you’re after a seamless, spa-like effect, choose the smallest possible grout line with a grout color close to your tile shade.
Can I use a complex pattern like herringbone or diagonal in a small space?
I wouldn’t recommend it for most small bathrooms. Herringbone or diagonal patterns can look busy and overwhelming if they cover a large wall or multiple surfaces. The only time they really work beautifully is when the bathroom is mostly painted and the tiles are purely decorative, used in small, intentional areas — like a niche, backsplash, or a tiny accent strip. This way, you get the visual interest without crowding the space.
Are vertical or stacked subway tile layouts better for low-ceiling bathrooms?
Definitely! Vertical stacked patterns are a great trick for bathrooms with lower ceilings — they draw the eye upward and make the space feel taller. A vertical offset pattern can also work beautifully if you want something a little softer and more dynamic. Pair it with light grout to keep the look airy and modern.
Horizontally stacked subway tile pattern fits very well too – as it optically widens the space, it has definitely an enlarging effect.
Do subway tile patterns affect installation difficulty or cost?
Yes, quite a lot. A simple horizontal layout (like running bond or stacked) is quick to install and more budget-friendly. More intricate patterns — herringbone, chevron, or diagonal — require more tile cuts, time, and precision, so the labor cost goes up. If you’re DIY-ing, start simple. If you’re going bold, plan it carefully and calculate a percentage of extra tiles for cutting waste.
Takeaway: Subway Tile Patterns – Your Turn
Choosing subway tile patterns and the right grout colors for white tile isn’t just a technical decision — it’s a way to define the character, rhythm, and feel of your bathroom.
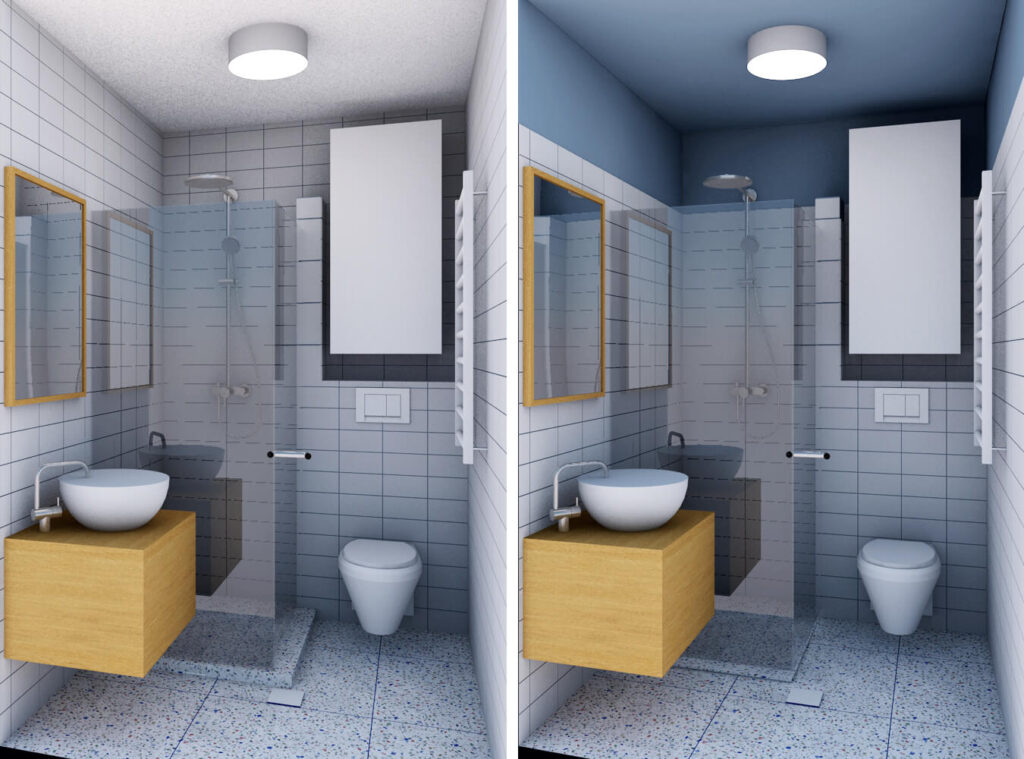
In my studio apartment renovation, I went for horizontally stacked white subway tile with 2 mm blue grout, and I even extended that blue to the ceiling. Small space? No problem — these tricks visually stretch the room, making it feel wider and more open. Take a look at the visualisation below, or read my post about this bathroom!
The takeaway: tile patterns, grout lines, and color accents work together to create atmosphere and style. Even in a tiny bathroom, thoughtful choices can make it feel bright, playful, or calming — all without changing the tile size or layout drastically.
Now it’s your turn: Which subway tile pattern would you pick for your bathroom? Would you go subtle with classic horizontal tiles, or bold with playful grout and accent walls? Drop your ideas and questions in the comments — your choices might inspire someone else’s bathroom makeover!
Pin it for later!