Renovation Budget Template: Professional Budget Planning for a Home Renovation
Budgeting is One of the Most Misunderstood Parts of Home Renovation
A Renovation Budget Template is not something I created because our renovation went wrong — it is something I use because budget estimation and planning are part of my daily work as an architect.
From the very beginning of this studio apartment renovation, the budget was structured, calculated, and monitored with the same methodology I use for professional projects.

Within the first planning phase, it became clear that without a clear renovation budget template, even a very small apartment renovation can lose structure quickly — not because people spend irresponsibly, but because costs appear unexpectedly, details get forgotten.
Budgeting is one of the most misunderstood parts of home renovation
Small size does not mean small cost. In studio apartments and compact homes, fixed expenses such as labor, plumbing, electrical work, and permits often represent a larger percentage of the total cost than they would in a larger home.
This article explains:
- how professionals approach renovation budgeting
- how and when to use a Renovation Budget Template
- how layout and finishes influence costs
- how to calculate backup quantities and contingency properly
- and how to track costs without constant re-planning
A free, editable Renovation Budget Template is included at the end – this is what I used for my studio apartment renovation project!
When Budget Planning Should Happen in a Renovation Process
Usually, it is smarter to calculate renovation costs before demolishing or building anything physically.
But right after:
- zoning and circulation decisions are made
- the layout is fixed
- finishes or finish types are decided
This is not a personal preference — it is a professional principle. This is the end of the planning phase, where we “plan the costs”.
In this phase you will have a choice to make the whole remodel cheaper, or it allows you to buy that nicer and more expensive tile for your kitchen.
Budgeting before layout and material decisions leads to abstract numbers that feel reassuring but rarely hold up during construction. A Renovation Budget Template works best when it is based on real decisions, not assumptions.
In our studio apartment renovation, budgeting happened like written.
But – it evolved through the phases, as things were changing (decided about new details, handles, etc). It allowed us to know exactly what amount of money was spent, and how close the project is to its financial limits.
As we are really short on money… I was choosing finishes based on their prices. The renovation budget template was really useful for comparison.
This sequence allowed us to:
- connect costs to actual design choices
- understand consequences before committing
- adjust priorities calmly, not reactively
A Renovation Budget Template is not static. It is a controlled system that evolves as the project moves forward.
FAQ — Budget Timing
When should I start using a Renovation Budget Template?
As soon as layout decisions are clear enough to estimate quantities.
Can I budget earlier than that?
Only at a rough level. Detailed numbers require real dimensions and material choices. Of course, it can be enough for early decisions, but costs adds up quickly.
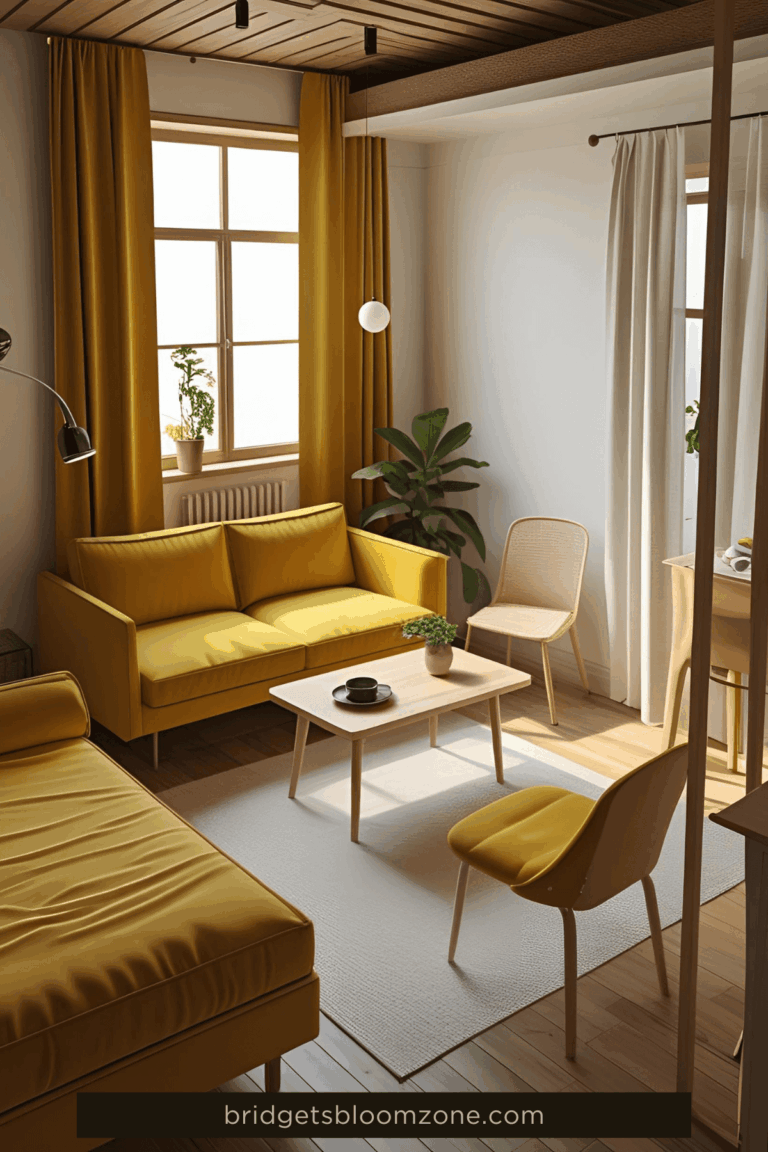
Why Budgeting Is Critical in a Studio Apartment Renovation
In a studio apartment renovation, usually there is almost no financial buffer created by size.
Overspending in one area means compromising elsewhere — often in ways that directly affect daily comfort.
This is why I treat the Renovation Budget Template as part of the design process, not an administrative task.
With a design it can be a spreadsheet for your material collection, with tailored prices.
Good budgeting does not limit design freedom.
It helps to choose the best available options for your apartment renovation.

Typical Renovation Cost Categories (Professional Structure)
Every Renovation Budget Template should be built on clear cost categories.
This makes the budget readable, adjustable, and comparable.
Typical Categories in a Studio Apartment Renovation
- demolition and waste removal
- wall construction – made from various materials
- water supply and wastewater renovation
- electrical systems and lighting infrastructure
- ventilation and heating
- door and window renovation
- floor, wall, and ceiling finishes
- painting and surface treatments
- bathroom renovation (usually the largest single item)
- kitchen and appliances
- custom storage and carpentry
- lighting fixtures
- furniture (new or modified)
- textiles and decoration
- contingency (10–15%)
- and labour work – get quotes from multiple contractors
Categorizing also helps you to think through the whole building process.
For example, tiling requires more than just tiles and adhesive.
You’ll also need grout, waterproofing, primer, corner reinforcement tape, and possibly silicone sealant.
These are the kinds of (hidden) costs people don’t always think about, and they can unexpectedly make a bathroom renovation more expensive.
How Detailed Should a Renovation Budget Template Be?
Detailed enough to support decisions — not overwhelm you.
Good signs your template works:
- you understand where money goes
- you can explain trade-offs
- you feel in control, not surprised
If you constantly feel confused, the structure is too vague.
This is My Key Strategy When Choosing Finishes, Furniture:
- Price & value, durability
- better to take a little research about the producer.
- warranty time is a good reference point
- better to take a little research about the producer.
- Visual appearance
- does this product match my vision?
- how would it affect the small space?
- does it match the other items I want to place?
- does this product match my vision?
- Maintenance
- easy to clean, does it collect dust?
- easy to clean, does it collect dust?
- Minimalist renovation
- Finishes: simple patterns, harmonic light colors
- Timeless in built-in pieces (finishes, bed, bathroom equipment)
- Fashionable pieces can be the smaller details: textiles, ceramics, chairs.
- Finishes: simple patterns, harmonic light colors
FAQ — Cost Categories
Can I simplify categories to make budgeting easier?
Well, you can simplify – but then be prepared for more surprices. Simpler categories reduce control, and make you forget about details, that will be left out of bought last minute.
What category surprises people most?
Electrical and plumbing upgrades. The invisible parts of a renovation, how I like to call them… These need professionals, and in some countries permits are needed for them to work. This means, it has much higher costs. Also, these are the elements in the homes that can be outdated, too old.
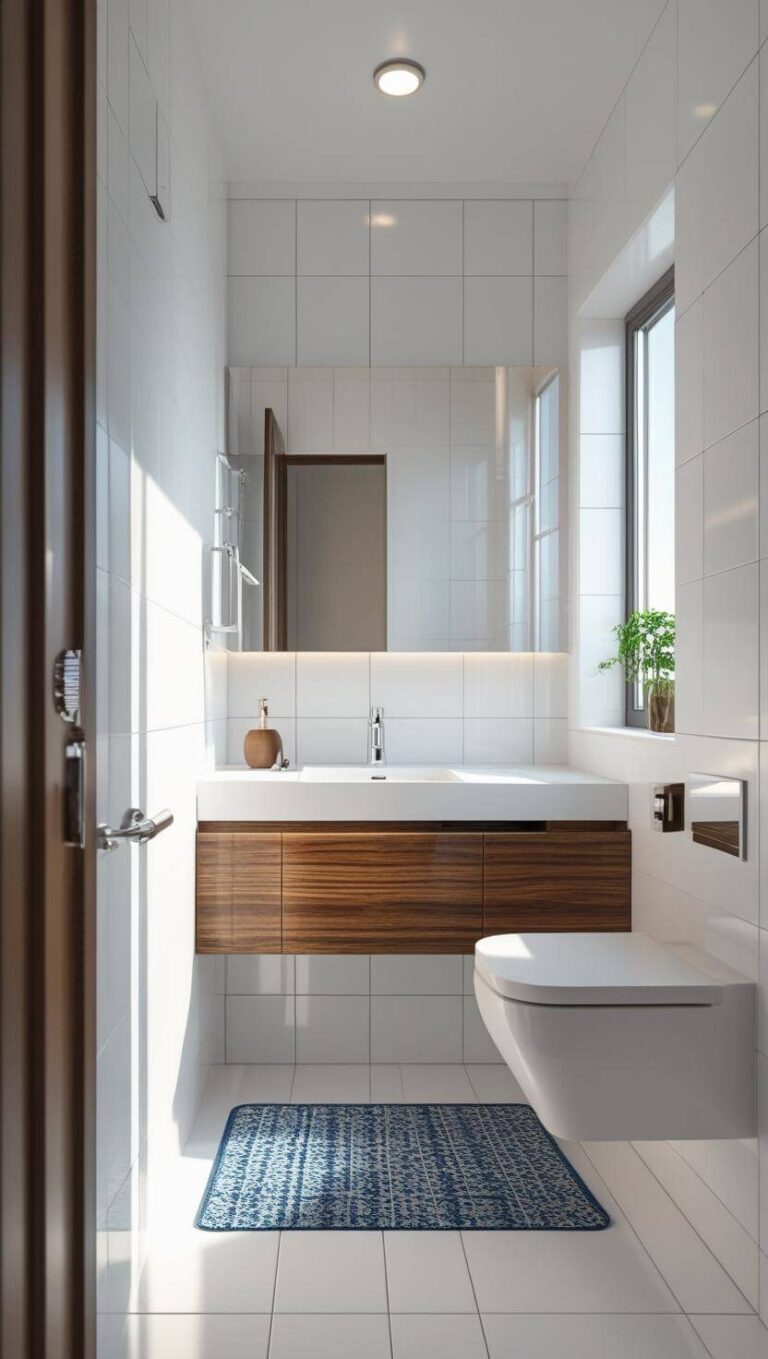
Bathroom Remodel on a Budget: What to Expect
In our renovation, the bathroom was one of the most expensive parts — even though it is the smallest room. This is typical.
A bathroom renovation includes:
- demolition
- plumbing and wastewater systems
- waterproofing
- tiling (materials and labor)
- ventilation
- lighting
- sanitary fixtures
Even a small bathroom renovation carries a high technical baseline. Certain things needs to be done.
Budget tip:
If your bathroom budget starts growing too fast, finishes are usually where adjustments are possible — not infrastructure.
It’s common practice to tile bathrooms from floor to ceiling, but in many cases, tiling only behind the sanitary fixtures is perfectly sufficient.
FAQ — Bathroom Budgeting
Why can’t I save money on plumbing?
Because errors here are expensive and permanent.
Where is it safe to reduce bathroom costs?
Tile size, layout complexity, and fixture selection.
Kitchen Remodel on a Budget: Fixed Costs First
In a studio apartment renovation, the kitchen is visually dominant but technically constrained.
Fixed kitchen costs include:
- appliance dimensions
- plumbing points
- electrical load
- ventilation
Flexible costs include:
- cabinet materials
- internal storage solutions
- surface finishes
A Renovation Budget Template helps distinguish between what must stay and what can change.
This clarity prevents late-stage compromises that affect function.
FAQ — Kitchen Costs
Can a kitchen be redesigned later?
Finishes yes, connections no.
Should kitchen costs be estimated early?
Connections must be planned early; finishes can follow.
Finishes, Quantities, and Professional Backup Calculation
Finish quantities are one of the most common sources of budget stress — usually because backup is guessed instead of calculated.
As a professional rule, I always calculate 10–15% extra material, depending on:
- tile size and layout
- cutting complexity
- wall alignment
- expected waste
This is not a safety margin born from uncertainty — it is a controlled allowance.
In our renovation, this approach proved its value.
When a tiler’s work had to be partially demolished and rebuilt, no additional tiles had to be ordered. The calculated backup was sufficient, and the renovation continued without delays or material mismatch.
We were lucky in this case – I decided for a small change in tiling design, and the tiles were just enough! Only a few pieces has been left…
FAQ — Extra Material
Is 10–15% always necessary?
Yes, but the exact percentage depends on layout complexity. For larger rooms, above 20-25 square meters, 10% can be enough. Complicated shaped rooms or lots of cutting needs more extra pieces, and smaller rooms needs also more backup.
Is leftover material waste?
No. You can keep them in case you need to replace some of them during renovation. After it, no need to keep all of them, you can resell it or donate it, someone will be happy about it.
Contingency in Costs: Planned
Contingency is not a sign of uncertainty — it is a sign of experience.
In renovation budgeting, contingency covers:
- hidden conditions
- minor design adjustments
- technical corrections
A realistic contingency is 10–15% of the total renovation budget.
FAQ — Contingency
What exactly is a contingency budget?
A contingency is a portion of the budget set aside to cover unexpected costs that may arise during a construction or renovation project. It acts as a financial safety net when things don’t go exactly as planned.
How much contingency should I include in my project budget?
A common rule of thumb is 5–10% of the total budget, but more complex or uncertain projects may require a higher percentage. The earlier the design stage and the older the building, the more contingency you should consider.
What kinds of costs can contingency cover?
Contingency can cover unforeseen site conditions, price increases, small design changes, hidden structural issues, or delays that affect costs. These are typically things you couldn’t reasonably predict at the planning stage.
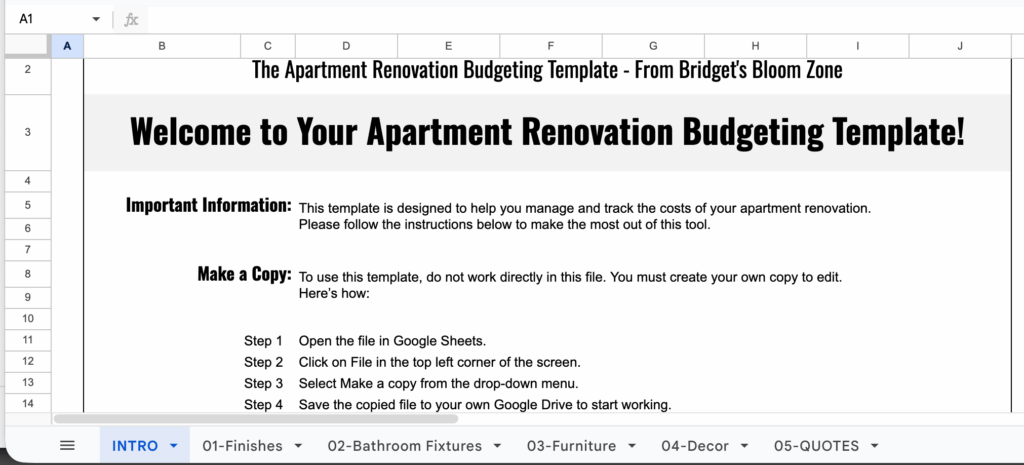
How to Use the Renovation Budget Template (Step by Step)
I used a simple spreadsheet-based Renovation Budget Template. Nothing fancy — but very structured. It is designed to be used actively, not filled out once and forgotten.
You will find all the important info also in the template!
Step 1: Insert Fixed Decisions
Start with:
- layout-based quantities (m2)
- technical systems (construction layers)
- known labor costs
These numbers should change rarely.
Step 2: Add Finish Scenarios
For finishes:
- list options – with prices, images, availability, notes
- compare cost impact – the spreadsheet calculates exactly the costs for the layout based quantities
- select intentionally
This makes trade-offs visible.
Step 3: Calculate Backup Quantities
Apply:
- 10–15% extra materials
- realistic waste assumptions
Do not round down to feel better.
Step 4: List All the Additional Components Required for the Chosen Finishes
This can be an extra task for diligent planners. During my own renovation, I simply added a link to things like the primer and noted the price next to it, so I could see what else needed to be prepared or purchased for that particular finish.
Of course, we ended up needing a lot of each of these items—but with more thorough planning from the start, I could have known the quantities in advance.
Step 5: Track Estimated vs Actual Costs
The template includes columns for:
- estimated cost
- actual cost
- difference
- notes (IMO this is always useful)
This allows you to see patterns early, and track what is still missing.
Extra Tip for a Visually Appealing Budget Spreadsheet
You can make your cost estimate not only useful but visually appealing—present the materials with images, almost like a mood board, instead of relying on a spreadsheet full of numbers.
How to place an image inside a cell in Google Sheets (so it stays there):
In Google Sheets, you can anchor an image to a specific cell instead of letting it float above the sheet. Select the cell where you want the image, then go to Insert > Image > Image in cell. Choose your file, and the image will be placed inside that cell and move/resize with it.
Resize the cell if needed – and you have a nice list with images!
FAQ — Using the Template
How often should I update it?
Weekly during active construction, or update anytime if you have bought something.
Should I delete old estimates?
As you wish – I like to keep them for comparison. You can delete it if your list feels crowded with old options. Or you can just hide the row.
Download the Free Renovation Budget Template
The Renovation Budget Template shared here is adapted from professional practice and adjusted for private renovations.
It works for:
- studio apartment renovations
- home remodeling
- bathroom remodels on a budget
- kitchen remodel on a budget
[Download the Free Renovation Budget Template]
Final Thoughts: Budgeting Is Part of Design
The Renovation Budget Template included in this guide is designed to support that process. It mirrors how renovation costs are structured in professional practice, not how they’re usually discussed online.
You can use it to:
- estimate costs realistically before work begins
- track changes without losing oversight
- plan contingencies intentionally, in time
- compare estimated vs actual spending as the renovation progresses
Whether you’re working on a home renovation, a small bathroom renovation, or planning a kitchen remodel on a budget, the same principle applies: budgeting works best when it follows design clarity.
Part of a Larger Renovation Process
If you’re following this renovation diary, this article connects directly to the broader renovation process explained in the main studio renovation guide. Each phase — planning, layout, finishes, demolition, and construction — feeds into the budget, not the other way around.
Read the full Studio Apartment Renovation Overview to see how this budgeting approach fits into the complete renovation timeline.
Let’s Keep the Conversation Practical
If you’re currently planning a renovation and trying to estimate costs, prioritize decisions, or adapt this Renovation Budget Template to your own project, feel free to leave a comment.
Questions about budgeting, trade-offs, or planning logic are always welcome — and this guide will continue to evolve as the renovation progresses.
Until then, save it for later!